
HotSpot Gateway
| Document revision: | 4.2 (Tue Jul 04 14:49:38 GMT 2006) |
| Applies to: | V2.9 |
General Information
Summary
The MikroTik HotSpot Gateway enables providing of public network access for clients using wireless or wired network connections.
HotSpot Gateway features:
- authentication of clients using local client database, or RADIUS server
- accounting using local database, or RADIUS server
- Walled-garden system (accessing some web pages without authorization)
Quick Setup Guide
The most noticeable difference in user experience setting up HotSpot system in version 2.9 from the previous RouterOS versions is that it has become in order of magnitude easier to set up a correctly working HotSpot system.
Given a router with two interfaces: Local (where HotSpot clients are connected to) and Public, which is connected to the Internet. To set up HotSpot on the Local interface:
- first, a valid IP config is required on both interfaces. This can be done with /setup command. In this example we will assume the configuration with DHCP server on the Local interface
- valid DNS configuration must be set up in the /ip dns submenu
-
To put HotSpot on the Local interface, using the same IP address pool as DHCP server uses for that interface:
/ip hotspot add interface=local address-pool=dhcp-pool-1 -
and finally, add at least one HotSpot user:
/ip hotspot user add name=admin
These simple steps should be sufficient to enable HotSpot system
Please find many HotSpot How-to's, which will answer most of your questions about configuring a HotSpot gateway, at the end of this manual. It is still recommended that you read and understand all the Description section below before deploying a HotSpot system.
If this does not work:
- check that /ip dns contains valid DNS servers, try to /ping www.mikrotik.com to see, that DNS resolving works
-
make sure that connection tracking is enabled:
/ip firewall connection tracking set enabled=yes
Specifications
Packages required: hotspot, dhcp(optional)License required: Level1 (Limited to 1 active user) , Level3 (Limited to 1 active user) , Level4 (Limited to 200 active users) , Level5 (Limited to 500 active users) , Level6
Submenu level: /ip hotspot
Standards and Technologies: ICMP, DHCP
Hardware usage: Not significant
Description
MikroTik HotSpot Gateway should have at least two network interfaces:
- HotSpot interface, which is used to connect HotSpot clients
- LAN/WAN interface, which is used to access network resources. For example, DNS and RADIUS server(s) should be accessible
The diagram below shows a sample HotSpot setup.
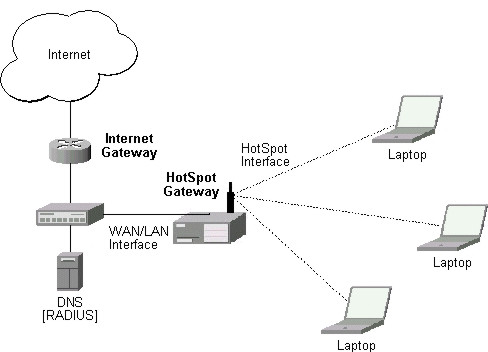
The HotSpot interface should have an IP address assigned to it. Physical network connection has to be established between the HotSpot user's computer and the gateway. It can be wireless (the wireless card should be registered to AP), or wired (the NIC card should be connected to a hub or a switch).
Note that the most noticeable difference in user experience setting up HotSpot system in version 2.9 from the previous RouterOS versions is that it has become in order of magnitude easier to set up a correctly working HotSpot system.
Introduction to HotSpotHotSpot is a way to authorize users to access some network resources. It does not provide traffic encryption. To log in, users may use almost any web browser (either HTTP or HTTPS protocol), so they are not required to install additional software. The gateway is accounting the uptime and amount of traffic each of its clients have used, and also can send this information to a RADIUS server. The HotSpot system may limit each particular user's bitrate, total amount of traffic, uptime and some other parameters mentioned further in this document.
The HotSpot system is targeted to provide authentication within a local network (to access the Internet), but may as well be used to authorize access from outer networks to access local resources. Configuring Walled Garden feature, it is possible to allow users to access some web pages without the need of prior authentication.
Getting AddressFirst of all, a client must get an IP address. It may be set on the client statically, or leased from a DHCP server. The DHCP server may provide ways of binding lent IP addresses to clients MAC addresses, if required. The HotSpot system does not care how did a client get an address before he/she gets to the HotSpot login page.
Moreover, HotSpot server may automatically and transparently change any IP address (yes, meaning really any IP address) of a client to a valid unused address from the selected IP pool. This feature gives a possibility to provide a network access (for example, Internet access) to mobile clients that are not willing (or are disallowed, not qualified enough or otherwise unable) to change their networking settings. The users will not notice the translation (i.e., there will not be any changes in the users' config), but the router itself will see completely different (from what is actually set on each client) source IP addresses on packets sent from the clients (even firewall mangle table will 'see' the translated addresses). This technique is called one-to-one NAT, but is also known as "Universal Client" as that is how it was called in the RouterOS version 2.8.
One-to-one NAT accepts any incoming address from a connected network interface and performs a network address translation so that data may be routed through standard IP networks. Clients may use any preconfigured addresses. If the one-to-one NAT feature is set to translate a client's address to a public IP address, then the client may even run a server or any other service that requires a public IP address. This NAT is changing source address of each packet just after it is received by the router (it is like source NAT that is performed earlier, so that even firewall mangle table, which normally 'sees' received packets unaltered, can only 'see' the translated address).
Note also that arp mode must be enabled on the interface you use one-to-one NAT on.
Before the authenticationWhen enabling HotSpot on an interface, the system automatically sets up everything needed to show login page for all clients that are not logged in. This is done by adding dynamic destination NAT rules, which you can observe on a working HotSpot system. These rules are needed to redirect all HTTP and HTTPS requests from unauthorized users to the HotSpot servlet (i.e., the authentication procedure, e.g., the login page). Other rules that are also inserted, we will describe later in a special section of this manual.
In most common setup, opening any HTTP page will bring up the HotSpot servlet login page (which can be customized extensively, as will be described later on). As normal user behavior is to open web pages by their DNS names, a valid DNS configuration should be set up on the HotSpot gateway itself (it is possible to reconfigure the gateway so that it will not require local DNS configuration, but such a configuration is impractical and thus not recommended).
Walled GardenYou may wish not to require authorization for some services (for example to let clients access the web server of your company without registration), or even to require authorization only to a number of services (for example, for users to be allowed to access an internal file server or another restricted area). This can be done by setting up Walled Garden system.
When a not logged-in user requests a service allowed in the Walled Garden configuration, the HotSpot gateway does not intercept it, or in case of HTTP, simply redirects the request to the original destination (or to a specified parent proxy). When a user is logged in, there is no effect of this table on him/her.
To implement the Walled Garden feature for HTTP requests, an embedded web proxy server has been designed, so all the requests from not authorized users are really going through this proxy. Note that the embedded proxy server does not have caching function yet. Also note that this embedded proxy server is in the system software package and does not require web-proxy package. It is configurable under /ip proxy
AuthenticationThere are currently 5 different authentication methods. You can use one or more of them simultaneously:
- HTTP PAP - simplest method, which shows the HotSpot login page and expect to get the authentication info (i.e. username and password) in plain text. Note that passwords are not being encrypted when transferred over the network. An another use of this method is the possibility of hard-coded authentication information in the servlet's login page simply creating the appropriate link.
- HTTP CHAP - standard method, which includes CHAP challenge in the login page. The CHAP MD5 hash challenge is to be used together with the user's password for computing the string which will be sent to the HotSpot gateway. The hash result (as a password) together with username is sent over network to HotSpot service (so, password is never sent in plain text over IP network). On the client side, MD5 algorithm is implemented in JavaScript applet, so if a browser does not support JavaScript (like, for example, Internet Explorer 2.0 or some PDA browsers), it will not be able to authenticate users. It is possible to allow unencrypted passwords to be accepted by turning on HTTP PAP authentication method, but it is not recommended (because of security considerations) to use that feature.
- HTTPS - the same as HTTP PAP, but using SSL protocol for encrypting transmissions. HotSpot user just send his/her password without additional hashing (note that there is no need to worry about plain-text password exposure over the network, as the transmission itself is encrypted). In either case, HTTP POST method (if not possible, then - HTTP GET method) is used to send data to the HotSpot gateway.
- HTTP cookie - after each successful login, a cookie is sent to web browser and the same cookie is added to active HTTP cookie list. Next time the same user will try to log in, web browser will send http cookie. This cookie will be compared with the one stored on the HotSpot gateway and only if source MAC address and randomly generated ID match the ones stored on the gateway, user will be automatically logged in using the login information (username and password pair) was used when the cookie was first generated. Otherwise, the user will be prompted to log in, and in the case authentication is successful, old cookie will be removed from the local HotSpot active cookie list and the new one with different random ID and expiration time will be added to the list and sent to the web browser. It is also possible to erase cookie on user manual logoff (not in the default server pages). This method may only be used together with HTTP PAP, HTTP CHAP or HTTPS methods as there would be nothing to generate cookies in the first place otherwise.
- MAC address - try to authenticate clients as soon as they appear in the hosts list (i.e., as soon as they have sent any packet to the HotSpot server), using client's MAC address as username
HotSpot can authenticate users consulting the local user database or a RADIUS server (local database is consulted first, then - a RADIUS server). In case of HTTP cookie authentication via RADIUS server, the router will send the same information to the server as was used when the cookie was first generated. If authentication is done locally, profile corresponding to that user is used, otherwise (in case RADIUS reply did not contain the group for that user) the default profile is used to set default values for parameters, which are not set in RADIUS access-accept message. For more information on how the interaction with a RADIUS server works, see the respective manual section.
The HTTP PAP method also makes it possible to authenticate by requesting the page /login?username=username&password=password . In case you want to log in using telnet connection, the exact HTTP request would look like that: GET /login?username=username&password=password HTTP/1.0 (note that the request is case-sensitive)
After authentication, user gets access to the Internet, and receives some limitations (which are user profile specific). HotSpot may also perform a one-to-one NAT for the client, so that a particular user would always receive the same IP address regardless of what PC is he/she working at.
The system will automatically detect and redirect requests to a proxy server a client is using (if any; it may be set in his/her settings to use an unknown to us proxy server) to the proxy server embedded in the router.
Authorization may be delegated to a RADIUS server, which delivers similar configuration options as the local database. For any user requiring authorization, a RADIUS server gets queried first, and if no reply received, the local database is examined. RADIUS server may send a Change of Authorization request according to standards to alter the previously accepted parameters.
AdvertisementThe same proxy used for unauthorized clients to provide Walled-Garden facility, may also be used for authorized users to show them advertisement popups. Transparent proxy for authorized users allows to monitor http requests of the clients and to take some action if required. It enables the possibility to open status page even if client is logged in by mac address, as well as to show advertisements time after time
When time has come to show an advertisement, the server redirects client's web browser to the status page. Only requests, which provide html content, are redirected (images and other content will not be affected). The status page displays the advertisement and next advertise-interval is used to schedule next advertisement. If status page is unable to display an advertisement for configured timeout starting from moment, when it is scheduled to be shown, client access is blocked within walled-garden (as unauthorized clients are). Client is unblocked when the scheduled page is finally shown. Note that if popup windows are blocked in the browser, the link on the status page may be used to open the advertisement manually.
While client is blocked, FTP and other services will not be allowed. Thus requiring client to open an advertisement for any Internet activity not especially allowed by the Walled-Garden.
AccountingThe HotSpot system implement accounting internally, you are not required to do anything special for it to work. The accounting information for each user may be sent to a RADIUS server.
Configuration menus- /ip hotspot - HotSpot servers on particular interfaces (one server per interface). HotSpot server must be added in this menu in order for HotSpot system to work on an interface
- /ip hotspot profile - HotSpot server profiles. Settings, which affect login procedure for HotSpot clients are configured here. More than one HotSpot servers may use the same profile
- /ip hotspot host - dynamic list of active network hosts on all HotSpot interfaces. Here you can also find IP address bindings of the one-to-one NAT
- /ip hotspot ip-binding - rules for binding IP addresses to hosts on hotspot interfaces
- /ip hotspot service-port - address translation helpers for the one-to-one NAT
- /ip hotspot walled-garden - Walled Garden rules at HTTP level (DNS names, HTTP request substrings)
- /ip hotspot walled-garden ip - Walled Garden rules at IP level (IP addresses, IP protocols)
- /ip hotspot user - local HotSpot system users
- /ip hotspot user profile - local HotSpot system users profiles (user groups)
- /ip hotspot active - dynamic list of all authenticated HotSpot users
- /ip hotspot cookie - dynamic list of all valid HTTP cookies
Question&Answer-Based Setup
Command name: /ip hotspot setupQuestions
address pool of network (name) - IP address pool for the HotSpot networkdns name (text) - DNS domain name of the HotSpot gateway (will be statically configured on the local DNS proxydns servers (IP address,[IP address]) - DNS servers for HotSpot clientshotspot interface (name) - interface to run HotSpot onip address of smtp server (IP address; default: 0.0.0.0) - IP address of the SMTP server to redirect SMTP requests (TCP port 25) toNotes
Depending on current settings and answers to the previous questions, default values of following questions may be different. Some questions may disappear if they become redundant
Example
To configure HotSpot on ether1 interface (which is already configured with address of 192.0.2.1/25), and adding user admin with password rubbish:
[admin@MikroTik] > ip hotspot setup
hotspot interface: ether1
local address of network: 192.0.2.1/24
masquerade network: yes
address pool of network: 192.0.2.2-192.0.2.126
select certificate: none
ip address of smtp server: 0.0.0.0
dns servers: 192.0.2.254
dns name: hs.example.net
name of local hotspot user: admin
password for the user: rubbish
[admin@MikroTik] >
HotSpot Interface Setup
Submenu level: /ip hotspotDescription
HotSpot system is put on individual interfaces. You can run completely different HotSpot configurations on different interfaces
Property Description
addresses-per-mac (integer | unlimited; default: 2) - number of IP addresses allowed to be bind with any particular MAC address (it is a small chance to reduce denial of service attack based on taking over all free IP addresses)Command Description
reset-html (name) - overwrite the existing HotSpot servlet with the original HTML files. It is used if you have changed the servlet and it is not working after thatNotes
addresses-per-mac property works only if address pool is defined. Also note that in case you are authenticating users connected through a router, than all the IP addresses will seem to have come from one MAC address.
Example
To add HotSpot system to the local interface, allowing the system to do one-to-one NAT for each client (addresses from the HS-real address pool will be used for the NAT):
[admin@MikroTik] ip hotspot> add interface=local address-pool=HS-real
[admin@MikroTik] ip hotspot> print
Flags: X - disabled, I - invalid, S - HTTPS
 #   NAME                        INTERFACE    ADDRESS-POOL PROFILE IDLE-TIMEOUT
 0   hs-local                    local        HS-real      default 00:05:00
[admin@MikroTik] ip hotspot>
HotSpot Server Profiles
Submenu level: /ip hotspot profileProperty Description
dns-name (text) - DNS name of the HotSpot server. This is the DNS name used as the name of the HotSpot server (i.e., it appears as the location of the login page). This name will automatically be added as a static DNS entry in the DNS cachehotspot-address (IP address; default: 0.0.0.0) - IP address for HotSpot servicehtml-directory (text; default: "") - name of the directory (accessible with FTP), which stores the HTML servlet pages (when changed, the default pages are automatically copied into specified directory if it does not exist already)http-cookie-lifetime (time; default: 3d) - validity time of HTTP cookieshttp-proxy (IP address; default: 0.0.0.0) - the address of the proxy server the HotSpot service will use as a proxy server for all those requests intercepted by Universal Proxy system and not defined in the /ip proxy direct list. If not specified, the address defined in parent-proxy parameter of /ip proxy. If that is absent too, the request will be resolved by the local proxylogin-by (multiple choice: cookie | http-chap | http-pap | https | mac | trial; default: cookie,http-chap) - which authentication methods to usehttp-chap - use CHAP challenge-response method with MD5 hashing algorithm for hashing passwords. This way it is possible to avoid sending clear-text passwords over an insecure network. This is the default authentication method
http-pap - use plain-text authentication over the network. Please note that in case this method will be used, your user passwords will be exposed on the local networks, so it will be possible to intercept them
https - use encrypted SSL tunnel to transfer user communications with the HotSpot server. Note that in order this to work, a valid certificate must be imported into the router (see a separate manual on certificate management)
mac - try to use client's MAC address first as its username. If the matching MAC address exists in the local user database or on the RADIUS server, the client will be authenticated without asking to fill the login form
trial - does not require authentication for a certain amount of time
received - use whatever value received from the RADIUS server
Notes
If dns-name property is not specified, hotspot-address is used instead. If hotspot-address is also absent, then both are to be detected automatically.
In order to use RADIUS authentication, the /radius menu must be set up accordingly.
Trial authentication method should allways be used together with one of the other authentication methods.
Example
HotSpot User Profiles
Submenu level: /ip hotspot user profileDescription
Article moved to: HotSpot AAA section
HotSpot Users
Submenu level: /ip hotspot userDescription
Article moved to: HotSpot AAA section
HotSpot Active Users
Submenu level: /ip hotspot activeDescription
Article moved to: HotSpot AAA section
HotSpot Cookies
Submenu level: /ip hotspot cookieDescription
Cookies can be used for authentication in the Hotspot service
Property Description
domain (read-only: text) - domain name (if split from username)expires-in (read-only: time) - how long the cookie is validmac-address (read-only: MAC address) - user's MAC addressuser (read-only: name) - usernameNotes
There can be multiple cookies with the same MAC address. For example, there will be a separate cookie for each web browser on the same computer.
Cookies can expire - that's the way how it is supposed to be. Default validity time for cookies is 3 days (72 hours), but it can be changed for each individual HotSpot server profile, for example :
/ip hotspot profile set default http-cookie-lifetime=1d
Example
To get the list of valid cookies:
[admin@MikroTik] ip hotspot cookie> print
  # USER               DOMAIN            MAC-ADDRESS       EXPIRES-IN
  0 ex                                   01:23:45:67:89:AB 23h54m16s
[admin@MikroTik] ip hotspot cookie>
HTTP-level Walled Garden
Submenu level: /ip hotspot walled-gardenDescription
Walled garden is a system which allows unauthorized use of some resources, but requires authorization to access other resources. This is useful, for example, to give access to some general information about HotSpot service provider or billing options.
This menu only manages Walled Garden for HTTP and HTTPS protocols. Other protocols can also be included in Walled Garden, but that is configured elsewhere (in /ip hotspot walled-garden ip; see the next section of this manual for details)
Property Description
action (allow | deny; default: allow) - action to undertake if a packet matches the rule:deny - the authorization is required to access this page
Notes
Wildcard properties (dst-host and dst-path) match a complete string (i.e., they will not match "example.com" if they are set to "example"). Available wildcards are '*' (match any number of any characters) and '?' (match any one character). Regular expressions are also accepted here, but if the property should be treated as a regular expression, it should start with a colon (':').
Small hits in using regular expressions:
- \\ symbol sequence is used to enter \ character in console
- \. pattern means . only (in regular expressions single dot in pattern means any symbol)
- to show that no symbols are allowed before the given pattern, we use ^ symbol at the beginning of the pattern
- to specify that no symbols are allowed after the given pattern, we use $ symbol at the end of the pattern
You can not use path property for HTTPS requests as router can not (and should not - that is what the HTTPS protocol was made for!) decrypt the request.
Example
To allow unauthorized requests to the www.example.com domain's /paynow.html page:
[admin@MikroTik] ip hotspot walled-garden> add path="/paynow.html" \
\... dst-host="www.example.com"
[admin@MikroTik] ip hotspot walled-garden> print
Flags: X - disabled, D - dynamic
 0   dst-host="www.example.com" path="/paynow.html" action=allow
[admin@MikroTik] ip hotspot walled-garden>
IP-level Walled Garden
Submenu level: /ip hotspot walled-garden ipDescription
This menu is manages Walled Garden for generic IP requests. See the previous section for managing HTTP and HTTPS protocol specific properties (like the actual DNS name, HTTP method and path used in requests).
Property Description
action (accept | drop | reject; default: accept) - action to undertake if a packet matches the rule:drop - the authorization is required to access this page
reject - the authorization is required to access this page, in case the page will be accsessed withot authorization ICMP reject message host-unreachable will be generated
Example
One-to-one NAT static address bindings
Submenu level: /ip hotspot ip-bindingDescription
You can setup NAT translations statically based on either the original IP address (or IP network), or the original MAC address. You can also allow some addresses to bypass HotSpot authentication (i.e., they will be able work without having to log in to the network first) and completely block some addresses.
Property Description
address (IP address / [netmask]; default: "") - the original IP address or network of the clientmac-address (MAC address; default: "") - the source MAC address of the clientserver (name|all; default: all) - the name of the server the client is connecting toto-address (IP address; default: "") - IP address to translate the original client address to. If address property is given as network, this is the starting address for the translation (i.e., the first address is translated to to-address, address + 1 to to-address + 1, and so on)type (regular | bypassed | blocked) - type of the static binding entrybypassed - perform the translation, but exclude the client from having to log in to the HotSpot system
blocked - the translation will not be preformed, and all packets from the host will be dropped
Notes
This is an ordered list, so you can put more specific entries on the top of the list for them to override the more common that appear lower.
Active Host List
Submenu level: /ip hotspot hostDescription
This menu shows all active network hosts that are connected to the HotSpot gateway. This list includes all one-to-one NAT translations
Property Description
address (read-only: IP address) - the original IP address of the clientauthorized (read-only: flag) - whether the client is successfully authenticated by the HotSpot systemblocked (read-only: flag) - true, if access is blocked within walled-garden because of expired advertisement timeoutbridge-port (read-only: name) - the actual physical interface, which the host is connected to. This is used when HotSpot service is put on a bridge interface to determine the host's actual port within the bridge.bypass-hotspot (read-only: flag) - whether the client does not need to be authorized by the HotSpot systembytes-in (read-only: integer) - how many bytes did the router receive from the clientbytes-out (read-only: integer) - how many bytes did the router send to the clienthost-dead-time (read-only: time) - how long has the router not received any packets (including ARP replies, keepalive replies and user traffic) from this hostidle-time (read-only: time) - the amount of time has the user been idleidle-timeout (read-only: time) - the exact value of idle-timeout that applies to this user. This property shows how long should the user stay idle for it to be logged off automaticallykeepalive-timeout (read-only: time) - the exact value of keepalive-timeout that applies to this user. This property shows how long should the user's computer stay out of reach for it to be logged off automaticallymac-address (read-only: MAC address) - the actual MAC address of the userpackets-in (read-only: integer) - how many packets did the router receive from the clientpackets-out (read-only: integer) - how many packets did the router send to the clientserver (read-only: name) - name of the server, which the host is connected to static (read-only: flag) - whether this translation has been taken from the static IP binding listto-address (read-only: IP address) - what address is the original IP address of the host translated touptime (read-only: time) - current session time of the user (i.e., how long has the user been in the active host list)Command Description
make-binding - copy a dynamic entry from this list to the static IP bindings listunnamed (name) - item number
comment (text) - custom comment to the static entry to be created
type (regular | bypassed | blocked) - the type of the static entry
Service Port
Submenu level: /ip hotspot service-portDescription
Just like for classic NAT, the HotSpot embedded one-to-one NAT 'breaks' some protocols that are incompatible with address translation. To leave these protocols consistent, helper modules must be used. For the one-to-one NAT the only such a module is for FTP protocol.
Property Description
name (read-only: name) - protocol nameports (read-only: integer) - list of the ports on which the protocol is workingExample
To set the FTP protocol uses both 20 and 21 TCP port:
[admin@MikroTik] ip hotspot service-port> print
Flags: X - disabled
  #   NAME                                                                PORTS
  0   ftp                                                                 21
[admin@MikroTik] ip hotspot service-port> set ftp ports=20,21
[admin@MikroTik] ip hotspot service-port> print
Flags: X - disabled
  #   NAME                                                                PORTS
  0   ftp                                                                 20
                                                                          21
[admin@MikroTik] ip hotspot service-port>
Customizing HotSpot: Firewall Section
Description
Apart from the obvious dynamic entries in the /ip hotspot submenu itself (like hosts and active users), some additional rules are added in the firewall tables when activating a HotSpot service. Unlike RouterOS version 2.8, there are relatively few firewall rules added in the firewall as the main job is made by the one-to-one NAT algorithm.
NAT rulesFrom /ip firewall nat print dynamic command, you can get something like this (comments follow after each of the rules):
0 D chain=dstnat hotspot=from-client action=jump jump-target=hotspot
Putting all HotSpot-related tasks for packets from all HotSpot clients into a separate chain
 1 D chain=hotspot protocol=udp dst-port=53 action=redirect to-ports=64872
 2 D chain=hotspot protocol=tcp dst-port=53 action=redirect to-ports=64872
Redirect all DNS requests to the HotSpot service. The 64872 port provides DNS service for all HotSpot users. If you want HotSpot server to listen also to another port, add rules here the same way, changing dst-port property
 3 D chain=hotspot protocol=tcp dst-port=80 hotspot=local-dst action=redirect
     to-ports=64873
Redirect all HTTP login requests to the HTTP login servlet. The 64873 is HotSpot HTTP servlet port.
 4 D chain=hotspot protocol=tcp dst-port=443 hotspot=local-dst action=redirect
     to-ports=64875
Redirect all HTTPS login requests to the HTTPS login servlet. The 64875 is HotSpot HTTPS servlet port.
5 D chain=hotspot protocol=tcp action=jump hotspot=!auth jump-target=hs-unauth
All other packets except DNS and login requests from unauthorized clients should pass through the hs-unauth chain
6 D chain=hotspot protocol=tcp action=jump hotspot=auth jump-target=hs-auth
And packets from the authorized clients - through the hs-auth chain
 7 D ;;; www.mikrotik.com
     chain=hs-unauth dst-address=159.148.147.196 protocol=tcp dst-port=80
     action=return
First in the hs-unauth chain is put everything that affects TCP protocol in the /ip hotspot walled-garden ip submenu (i.e., everything where either protocol is not set, or set to TCP). Here we are excluding www.mikrotik.com from being redirected to the login page.
8 D chain=hs-unauth protocol=tcp dst-port=80 action=redirect to-ports=64874
All other HTTP requests are redirected to the Walled Garden proxy server which listens the 64874 port. If there is an allow entry in the /ip hotspot walled-garden menu for an HTTP request, it is being forwarded to the destination. Otherwise, the request will be automatically redirected to the HotSpot login servlet (port 64873).
 9 D chain=hs-unauth protocol=tcp dst-port=3128 action=redirect to-ports=64874
10 D chain=hs-unauth protocol=tcp dst-port=8080 action=redirect to-ports=64874
HotSpot by default assumes that only these ports may be used for HTTP proxy requests. These two entries are used to "catch" client requests to unknown proxies. I.e., to make it possible for the clients with unknown proxy settings to work with the HotSpot system. This feature is called "Universal Proxy". If it is detected that a client is using some proxy server, the system will automatically mark that packets with the http hotspot mark to work around the unknown proxy problem, as we will see later on. Note that the port used (64874) is the same as for HTTP requests in the rule #8 (so both HTTP and HTTP proxy requests are processed by the same code).
11 D chain=hs-unauth protocol=tcp dst-port=443 action=redirect to-ports=64875
HTTPS proxy is listening on the 64875 port
12 D chain=hs-unauth protocol=tcp dst-port=25 action=jump jump-target=hs-smtp
Redirect for SMTP protocol may also be defined in the HotSpot configuration. In case it is, a redirect rule will be put in the hs-smtp chain. This is done so that users with unknown SMTP configuration would be able to send their mail through the service provider's (your) SMTP server instead of going to [possibly unavailable outside their network of origin] the SMTP server users have configured in their computers.
13 D chain=hs-auth protocol=tcp hotspot=http action=redirect to-ports=64874
Providing HTTP proxy service for authorized users. Authenticated user requests may need to be subject to the transparent proxying (the "Universal Proxy" technique and for the advertisement feature). This http mark is put automatically on the HTTP proxy requests to the servers detected by the HotSpot HTTP proxy (the one that is listening on the 64874 port) to be HTTP proxy requests to unknown proxy servers. This is done so that users that have some proxy settings would use the HotSpot gateway instead of the [possibly unavailable outside their network of origin] proxy server users have configured in their computers. The mark is as well put on any HTTP requests done form the users whoose profile is configured to transparently proxy their requests.
14 D chain=hs-auth protocol=tcp dst-port=25 action=jump jump-target=hs-smtp
Providing SMTP proxy for authorized users (the same as in rule #12)
Packet filter rulesFrom /ip firewall filter print dynamic command, you can get something like this (comments follow after each of the rules):
0 D chain=forward hotspot=from-client,!auth action=jump jump-target=hs-unauth
Any packet that traverse the router from unauthorized client will be sent to the hs-unauth chain. The hs-unauth implements the IP-based Walled Garden filter.
1 D chain=forward hotspot=to-client,!auth action=jump jump-target=hs-unauth-to
Everything that comes to clients through the router, gets redirected to another chain, called hs-unauth-to. This chain should reject unauthorized requests to the clients
2 D chain=input hotspot=from-client action=jump jump-target=hs-input
Everything that comes from clients to the router itself, gets to another chain, called hs-input.
 3 D chain=hs-input protocol=udp dst-port=64872 action=accept
 4 D chain=hs-input protocol=tcp dst-port=64872-64875 action=accept
Allow client access to the local authentication and proxy services (as described earlier)
5 D chain=hs-input hotspot=!auth action=jump jump-target=hs-unauth
All other traffic from unauthorized clients to the router itself will be treated the same way as the traffic traversing the routers
 6 D chain=hs-unauth protocol=icmp action=return
 7 D ;;; www.mikrotik.com
     chain=hs-unauth dst-address=159.148.147.196 protocol=tcp dst-port=80
     action=return
Unlike NAT table where only TCP-protocol related Walled Garden entries were added, in the packet filter hs-unauth chain is added everything you have set in the /ip hotspot walled-garden ip menu. That is why although you have seen only one entry in the NAT table, there are two rules here.
 8 D chain=hs-unauth protocol=tcp action=reject reject-with=tcp-reset
 9 D chain=hs-unauth action=reject reject-with=icmp-net-prohibited
Everything else that has not been while-listed by the Walled Garden will be rejected. Note usage of TCP Reset for rejecting TCP connections.
10 D chain=hs-unauth-to action=reject reject-with=icmp-host-prohibited
Reject all packets to the clients with ICMP reject message
Customizing HotSpot: HTTP Servlet Pages
Description
You can create a completely different set of servlet pages for each HotSpot server you have, specifying the directory it will be stored in html-directory property of a HotSpot server profile (/ip hotspot profile). The default servlet pages are copied in the directory of your choice right after you create the profile. This directory can be accessed by connecting to the router with an FTP client. You can modify the pages as you like using the information from this section of the manual.
Available Servlet PagesMain HTML servlet pages, which are shown to user:
- redirect.html - redirects user to another url (for example, to login page)
-
login.html - login page shown to a user to ask for username and password. This page may take the following parameters:
- username - username
- password - either plain-text password (in case of PAP authentication) or MD5 hash of chap-id variable, password and CHAP challenge (in case of CHAP authentication)
- dst - original URL requested before the redirect. This will be opened on successfull login
- popup - whether to pop-up a status window on successfull login
- radius<id> - send the attribute identified with <id> in text string form to the RADIUS server (in case RADIUS authentication is used; lost otherwise)
- radius<id>u - send the attribute identified with <id> in unsigned form to the RADIUS server (in case RADIUS authentication is used; lost otherwise)
- radius<id>-<vnd-id> - send the attribute identified with <id> and vendor ID <vnd-id> in text string form to the RADIUS server (in case RADIUS authentication is used; lost otherwise)
- radius<id>-<vnd-id>u - send the attribute identified with <id> and vendor ID <vnd-id> in unsigned form to the RADIUS server (in case RADIUS authentication is used; lost otherwise)
- md5.js - JavaScript for MD5 password hashing. Used together with http-chap login method
- alogin.html - page shown after client has logged in. It pops-up status page and redirects browser to originally requested page (before he/she was redirected to the HotSpot login page)
- status.html - status page, shows statistics for the client
-
logout.html - logout page, shown after user is logged out. Shows final statistics about the finished session. This page may take the folllowing additional parameters:
- erase-cookie - whether to erase cookies from the HotSpot server on logout (makes impossible to log in with cookie next time from the same browser, might be useful in multiuser environments)
- error.html - error page, shown on fatal errors only
Some other pages are available as well, if more control is needed:
- rlogin.html - page, which redirects client from some other URL to the login page, if authorization of the client is required to access that URL
- rstatus.html - similarly to rlogin.html, only in case if the client is already logged in and the original URL is not known
- flogin.html - shown instead of login.html, if some error has happened (invalid username or password, for example)
- fstatus.html - shown instead of redirect, if status page is requested, but client is not logged in
- flogout.html - shown instead of redirect, if logout page is requested, but client is not logged in
The HotSpot servlet recognizes 5 different request types:
-
request for a remote host
- if user is logged in, the requested page is served
- if user is not logged in, but the destination host is allowed by walled garden, then the request is also served
- if user is not logged in, and the destination host is disallowed by walled garden, rlogin.html is displayed; if rlogin.html is not found, redirect.html is used to redirect to the login page
-
request for "/" on the HotSpot host
- if user is logged in, rstatus.html is displayed; if rstatus.html is not found, redirect.html is used to redirect to the status page
- if user is not logged in, rlogin.html is displayed; if rlogin.html is not found, redirect.html is used to redirect to the login page
-
request for "/login" page
- if user has successfully logged in (or is already logged in), alogin.html is displayed; if alogin.html is not found, redirect.html is used to redirect to the originally requested page or the status page (in case, original destination page was not given)
- if user is not logged in (username was not supplied, no error message appeared), login.html is showed
- if login procedure has failed (error message is supplied), flogin.html is displayed; if flogin.html is not found, login.html is used
- in case of fatal errors, error.html is showed
-
request for "/status" page
- if user is logged in, status.html is displayed
- if user is not logged in, fstatus.html is displayed; if fstatus.html is not found, redirect.html is used to redirect to the login page
-
request for '/logout' page
- if user is logged in, logout.html is displayed
- if user is not logged in, flogout.html is displayed; if flogout.html is not found, redirect.html is used to redirect to the login page
Note that if it is not possible to meet a request using the pages stored on the router's FTP server, Error 404 is displayed
There are many possibilities to customize what the HotSpot authentication pages look like:
- The pages are easily modifiable. They are stored on the router's FTP server in the directory you choose for the respective HotSpot server profile.
- By changing the variables, which client sends to the HotSpot servlet, it is possible to reduce keyword count to one (username or password; for example, the client's MAC address may be used as the other value) or even to zero (License Agreement; some predefined values general for all users or client's MAC address may be used as username and password)
- Registration may occur on a different server (for example, on a server that is able to charge Credit Cards). Client's MAC address may be passed to it, so that this information need not be written in manually. After the registration, the server may change RADIUS database enabling client to log in for some amount of time.
To insert variable in some place in HTML file, the $(var_name) syntax is used, where the "var_name" is the name of the variable (without quotes). This construction may be used in any HotSpot HTML file accessed as '/', '/login', '/status' or '/logout', as well as any text or HTML file stored on the HotSpot server. For example, to show a link to the login page, following construction can be used:
<a href="$(link-login)">login</a>Variables
All of the Servlet HTML pages use variables to show user specific values. Variable names appear only in the HTML source of the servlet pages - they are automatically replaced with the respective values by the HotSpot Servlet. For each variable there is an example of its possible value included in brackets. All the described variables are valid in all servlet pages, but some of them just might be empty at the time they are accesses (for example, there is no uptime before a user has logged in).
-
Common server variables:
- hostname - DNS name or IP address (if DNS name is not given) of the HotSpot Servlet ("hotspot.example.net")
- identity - RouterOS identity name ("MikroTik")
- login-by - authentication method used by user
- plain-passwd - a "yes/no" representation of whether HTTP-PAP login method is allowed ("no")
- server-address - HotSpot server address ("10.5.50.1:80")
- server-name - name of hotspot server
- ssl-login - a "yes/no" representation of whether HTTPS method was used to access that servlet page ("no")
- server-name - HotSpot server name (set in the /ip hotspot menu, as the name property)
- interface-name - physical HotSpot interface name (in case of bridged interfaces, this will return the actual bridge port name)
-
Links:
- link-login - link to login page including original URL requested ("http://10.5.50.1/login?dst=http://www.example.com/")
- link-login-plain - link to login page, not including original URL requested ("http://10.5.50.1/login")
- link-logout - link to logout page ("http://10.5.50.1/logout")
- link-status - link to status page ("http://10.5.50.1/status")
- link-orig - original URL requested ("http://www.example.com/")
-
General client information
- domain - domain name of the user ("mt.lv")
- interface-name - name of the physical interface, on which client is connected (in case of bridge, it will contain the name of bridge port)
- ip - IP address of the client ("10.5.50.2")
- logged-in - "yes" if the user is logged in, otherwise - "no" ("yes")
- mac - MAC address of the user ("01:23:45:67:89:AB")
- trial - a "yes/no" representation of whether the user has access to trial time. If users trial time has expired, the value is "no"
- username - the name of the user ("John")
-
User status information:
- idle-timeout - idle timeout ("20m" or "" if none)
- idle-timeout-secs - idle timeout in seconds ("88" or "0" if there is such timeout)
- limit-bytes-in - byte limit for send ("1000000" or "---" if there is no limit)
- limit-bytes-out - byte limit for receive ("1000000" or "---" if there is no limit)
- refresh-timeout - status page refresh timeout ("1m30s" or "" if none)
- refresh-timeout-secs - status page refresh timeout in seconds ("90s" or "0" if none)
- session-timeout - session time left for the user ("5h" or "" if none)
- session-timeout-secs - session time left for the user, in seconds ("3475" or "0" if there is such timeout)
- session-time-left - session time left for the user ("5h" or "" if none)
- session-time-left-secs - session time left for the user, in seconds ("3475" or "0" if there is such timeout)
- uptime - current session uptime ("10h2m33s")
- uptime-secs - current session uptime in seconds ("125")
-
Traffic counters, which are available only in status page:
- bytes-in - number of bytes received from the user ("15423")
- bytes-in-nice - user-friendly form of number of bytes received from the user ("15423")
- bytes-out - number of bytes sent to the user ("11352")
- bytes-out-nice - user-friendly form of number of bytes sent to the user ("11352")
- packets-in - number of packets received from the user ("251")
- packets-out - number of packets sent to the user ("211")
- remain-bytes-in - remaining bytes until limit-bytes-in will be reached ("337465" or "---" if there is no limit)
- remain-bytes-out - remaining bytes until limit-bytes-out will be reached ("124455" or "---" if there is no limit)
-
Miscellaneous variables
- session-id - value of 'session-id' parameter in the last request
- var - value of 'var' parameter in the last request
- error - error message, if something failed ("invalid username or password")
- error-orig - original error message (without translations retrieved from errors.txt), if something failed ("invalid username or password")
- chap-id - value of chap ID ("\371")
- chap-challenge - value of chap challenge ("\357\015\330\013\021\234\145\245\303\253\142\246\133\175\375\316")
- popup - whether to pop-up checkbox ("true" or "false")
- advert-pending - whether an advertisement is pending to be displayed ("yes" or "no")
-
RADIUS-related variables
- radius<id> - show the attribute identified with <id> in text string form (in case RADIUS authentication was used; "" otherwise)
- radius<id>u - show the attribute identified with <id> in unsigned form (in case RADIUS authentication was used; "0" otherwise)
- radius<id>-<vnd-id> - show the attribute identified with <id> and vendor ID <vnd-id> in text string form (in case RADIUS authentication was used; "" otherwise)
- radius<id>-<vnd-id>u - show the attribute identified with <id> and vendor ID <vnd-id> in unsigned form (in case RADIUS authentication was used; "0" otherwise)
$(if <var_name>) statements can be used in theses pages. Following content will be included, if value of <var_name> will not be an empty string. It is an equivalent to
$(if <var_name> != "")
It is possible to compare on equivalence as well:
$(if <var_name> == <value>)
These statements have effect until $(elif <var_name>), $(else) or $(endif). In general case it looks like this:
some content, which will always be displayed
$(if username == john)
Hey, your username is john
$(elif username == dizzy)
Hello, Dizzy! How are you? Your administrator.
$(elif ip == 10.1.2.3)
You are sitting at that crappy computer, which is damn slow...
$(elif mac == 00:01:02:03:04:05)
This is an ethernet card, which was stolen few months ago...
$(else)
I don't know who you are, so lets live in peace.
$(endif)
other content, which will always be displayed
Only one of those expressions will be shown. Which one - depends on values of those variables for each client.
Customizing Error MessagesAll error messages are stored in the errors.txt file within the respective HotSpot servlet directory. You can change and translate all these messages to your native language. To do so, edit the errors.txt file. You can also use variables in the messages. All instructions are given in that file.
Multiple Versions of HotSpot PagesMultiple hotspot page sets for the same hotspot server are supported. They can be chosen by user (to select language) or automatically by JavaScript (to select PDA/regular version of HTML pages).
To utilize this feature, create subdirectories in HotSpot HTML directory, and place those HTML files, which are different, in that subdirectory. For example, to translate everything in Latvian, subdirectory "lv" can be created with login.html, logout.html, status.html, alogin.html, radvert.html and errors.txt files, which are translated into Latvian. If the requested HTML page can not be found in the requested subdirectory, the corresponding HTML file from the main directory will be used. Then main login.html file would contain link to "/lv/login?dst=$(link-orig-esc)", which then displays Latvian version of login page: <a href="/lv/login?dst=$(link-orig-esc)">Latviski</a> . And Latvian version would contain link to English version: <a href="/login?dst=$(link-orig-esc)">English</a>
Another way of referencing directories is to specify 'target' variable:
        <a href="$(link-login-only)?dst=$(link-orig-esc)&target=lv">Latviski</a>
        <a href="$(link-login-only)?dst=$(link-orig-esc)&target=%2F">English</a>
After preferred directory has been selected (for example, "lv"), all links to local HotSpot pages will contain that path (for example, $(link-status) = "http://hotspot.mt.lv/lv/status"). So, if all hotspot pages reference links using "$(link-xxx)" variables, then no more changes are to be made - each client will stay within the selected directory all the time.
Notes
If you want to use HTTP-CHAP authentication method it is supposed that you include the doLogin() function (which references to the md5.js which must be already loaded) before the Submit action of the login form. Otherwise, CHAP login will fail.
The resulting password to be sent to the HotSpot gateway in case of HTTP-CHAP method, is formed MD5-hashing the concatenation of the following: chap-id, the password of the user and chap-challenge (in the given order)
In case if variables are to be used in link directly, then they must be escaped accordingly. For example, in login page, <a href="https://login.example.com/login?mac=$(mac)&user=$(username)">link</a> will not work as intended, if username will be "123&456=1 2". In this case instead of $(user), its escaped version must be used: $(user-esc): <a href="https://login.server.serv/login?mac=$(mac-esc)&user=$(user-esc)">link</a>. Now the same username will be converted to "123%26456%3D1+2", which is the valid representation of "123&456=1 2" in URL. This trick may be used with any variables, not only with $(username).
There is a boolean parameter "erase-cookie" to the logout page, which may be either "on" or "true" to delete user cookie on logout (so that the user would not be automatically logged on when he/she opens a browser next time.
Example
With basic HTML language knowledge and the examples below it should be easy to implement the ideas described above.
-
To provide predefined value as username, in login.html change:
<type="text" value="$(username)>
to this line:
<input type="hidden" name="user" value="hsuser">
(where hsuser is the username you are providing)
-
To provide predefined value as password, in login.html change:
<input type="password">
to this line:
<input type="hidden" name="password" value="hspass">
(where hspass is the password you are providing)
-
To send client's MAC address to a registration server in form of:
https://www.server.serv/register.html?mac=XX:XX:XX:XX:XX:XX
change the Login button link in login.html to:
https://www.server.serv/register.html?mac=$(mac)
(you should correct the link to point to your server)
-
To show a banner after user login, in alogin.html after
$(if popup == 'true')
add the following line:
open('http://your.web.server/your-banner-page.html', 'my-banner-name','');(you should correct the link to point to the page you want to show)
-
To choose different page shown after login, in login.html change:
<input type="hidden" name="dst" value="$(link-orig)">
to this line:
<input type="hidden" name="dst" value="http://your.web.server">
(you should correct the link to point to your server)
-
To erase the cookie on logoff, in the page containing link to the logout (for example, in status.html) change:
open('$(link-logout)', 'hotspot_logout', ...to this:
open('$(link-logout)?erase-cookie=on', 'hotspot_logout', ...or alternatively add this line:
<input type="hidden" name="erase-cookie" value="on">
before this one:
<input type="submit" value="log off">
An another example is making HotSpot to authenticate on a remote server (which may, for example, perform creditcard charging):
- Allow direct access to the external server in walled-garden (either HTTP-based, or IP-based)
-
Modify login page of the HotSpot servlet to redirect to the external authentication server. The external server should modify RADIUS database as needed
Here is an example of such a login page to put on the HotSpot router (it is redirecting to https://auth.example.com/login.php, replace with the actual address of an external authentication server):
<html> <title>...</title> <body> <form name="redirect" action="https://auth.example.com/login.php" method="post"> <input type="hidden" name="mac" value="$(mac)"> <input type="hidden" name="ip" value="$(ip)"> <input type="hidden" name="user" value="$(username)"> <input type="hidden" name="link-login" value="$(link-login)"> <input type="hidden" name="link-orig" value="$(link-orig)"> <input type="hidden" name="error" value="$(error)"> </form> <script language="JavaScript"> <!-- document.redirect.submit(); //--> </script> </body> </html> -
The external server can log in a HotSpot client by redirecting it back to the original HotSpot servlet login page, specifying the correct username and password
Here is an example of such a page (it is redirecting to https://hotspot.example.com/login, replace with the actual address of a HotSpot router; also, it is displaying www.mikrotik.com after successful login, replace with what needed):
<html> <title>Hotspot login page</title> <body> <form name="login" action="https://hotspot.example.com/login" method="post"> <input type="text" name="username" value="demo"> <input type="password" name="password" value="none"> <input type="hidden" name="domain" value=""> <input type="hidden" name="dst" value="http://www.mikrotik.com/"> <input type="submit" name="login" value="log in"> </form> </body> </html> - Hotspot will ask RADIUS server whether to allow the login or not. If not allowed, alogin.html page will be displayed (it can be modified to do anything!). If not allowed, flogin.html (or login.html) page will be displayed, which will redirect client back to the external authentication server.
- Note: as shown in these examples, HTTPS protocol and POST method can be used to secure communications.
Possible Error Messages
Description
There are two kinds of errors: fatal non-fatal. Fatal errors are shown on a separate HTML page called error.html. Non-fatal errors are basically indicating incorrect user actions and are shown on the login form.
General non-fatal errors:
- You are not logged in - trying to access the status page or log off while not logged in. Solution: log in
- already authorizing, retry later - authorization in progress. Client already has issued an authorization request which is not yet complete. Solution: wait for the current request to be completed, and then try again
- chap-missing = web browser did not send challenge response (try again, enable JavaScript) - trying to log in with HTTP-CHAP method using MD5 hash, but HotSpot server does not know the challenge used for the hash. This may happen if you use BACK buttons in browser; if JavaScript is not enabled in web browser; if login.html page is not valid; or if challenge value has expired on server (more than 1h of inactivity). Solution: instructing browser to reload (refresh) the login page usually helps if JavaScript is enabled and login.html page is valid
- invalid username ($(username)): this MAC address is not yours - trying to log in using a MAC address username different from the actual user's MAC address. Solution: no - users with usernames that look like a MAC address (eg., 12:34:56:78:9a:bc) may only log in from the MAC address specified as their user name
- session limit reached ($(error-orig)) - depending on licence number of active hotspot clients is limited to some number. The error is displayed when this limit is reached. Solution: try to log in later when there will be less concurrent user sessions, or buy an another license that allows more simultaneous sessions
- hotspot service is shutting down - RouterOS is currently being restarted or shut down. Solution: wait until the service will be available again
General fatal errors:
- internal error ($(error-orig)) - this should never happen. If it will, error page will be shown displaying this error message (error-orig will describe what has happened). Solution: correct the error reported
- configuration error ($(error-orig)) - the HotSpot server is not configured properly (error-orig will describe what has happened). Solution: correct the error reported
- cannot assign ip address - no more free addresses from pool - unable to get an IP address from an IP pool as there is no more free IP addresses in that pool. Solution: make sure there is a sufficient amount of free IP addresses in IP pool
Local HotSpot user database non-fatal errors:
- invalid username or password - self-explanatory
- user $(username) is not allowed to log in from this MAC address - trying to log in from a MAC address different from specified in user database. Solution: log in from the correct MAC address or take out the limitation
- user $(username) has reached uptime limit - self-explanatory
- user $(username) has reached traffic limit - either limit-bytes-in or limit-bytes-out limit is reached
- no more sessions are allowed for user $(username) - the shared-users limit for the user's profile is reached. Solution: wait until someone with this username logs out, use different login name or extend the shared-users limit
RADIUS client non-fatal errors:
- invalid username or password - RADIUS server has rejected the username and password sent to it without specifying a reason. Cause: either wrong username and/or password, or other error. Solution: should be clarified in RADIUS server's log files
- <error_message_sent_by_radius_server> - this may be any message (any text string) sent back by RADIUS server. Consult with your RADIUS server's documentation for further information
RADIUS client fatal errors:
- RADIUS server is not responding - user is being authenticated by RADIUS server, but no response is received from it. Solution: check whether the RADIUS server is running and is reachable from the HotSpot router
HotSpot How-to's
Description
This section will focus on some simple examples of how to use your HotSpot system, as well as give some useful ideas.
Setting up https authorizationAt first certificate must be present with decrypted private key:
[admin@MikroTik] > /certificate print
Flags: K - decrypted-private-key, Q - private-key, R - rsa, D - dsa
 0 KR name="hotspot.example.net"
      subject=C=LV,L=Riga,O=MT,OU=dev,CN=hotspot.example.net,
              emailAddress=admin@hotsot.example.net
      issuer=C=LV,L=Riga,O=MT,OU=dev,CN=hotsot.example.net,
             emailAddress=admin@hotsot.example.net
      serial-number="0" email=admin@hotsot.example.net
      invalid-before=oct/27/2004 11:43:22 invalid-after=oct/27/2005 11:43:22
      ca=yes
Then we can use that certificate for hotspot:
/ip hotspot profile set default login-by=cookie,http-chap,https \
ssl-certificate=artis.hotspot.mt.lv
After that we can see, that HTTPS is running on hotspot interface:
[admin@MikroTik] > /ip hotspot print
Flags: X - disabled, I - invalid, S - HTTPS
 #   NAME                        INTERFACE    ADDRESS-POOL PROFILE IDLE-TIMEOUT
 0 S hs-local                    local                     default 00:05:00
Bypass hotspot for some devices in hotspot network
All IP binding entries with type property set to bypassed, will not be asked to authorize - it means that they will have login-free access:
[admin@MikroTik] ip hotspot ip-binding> print
Flags: X - disabled, P - bypassed, B - blocked
 #   MAC-ADDRESS       ADDRESS         TO-ADDRESS      SERVER
 0 P                   10.11.12.3
If all fields has been filled in the ip-binding table and type has been set to bypassed, then the IP address of this entry will be accessible from public interfaces immediately:
[admin@MikroTik] ip hotspot ip-binding> print
Flags: X - disabled, P - bypassed, B - blocked
 #   MAC-ADDRESS       ADDRESS         TO-ADDRESS      SERVER
 0 P                   10.11.12.3
 1 P 00:01:02:03:04:05 10.11.12.3      10.11.12.3      hs-local
[admin@MikroTik] ip hotspot ip-binding> .. host print
Flags: S - static, H - DHCP, D - dynamic, A - authorized, P - bypassed
 #    MAC-ADDRESS       ADDRESS         TO-ADDRESS      SERVER   IDLE-TIMEOUT
 0 SB 00:01:02:03:04:05 10.11.12.3      10.11.12.3      hs-local