
Installing RouterOS with NetInstall
| Document revision: | 1.3 (Mon Jul 19 12:58:25 GMT 2004) |
| Applies to: | V2.9 |
NetInstall
Description
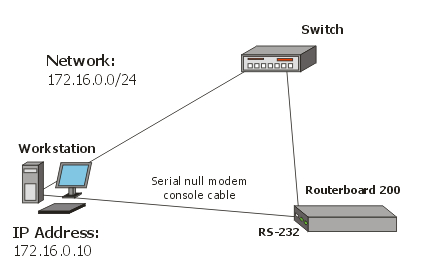
NetInstall is a program that allows you to install MikroTiK RouterOS on a dedicated PC or RouterBoard via Ethernet network. All you need is a blank floppy or an Ethernet device that supports PXE (like RouterBoard 100, RouterBoard 200 and RouterBoard 500 series), an Ethernet network between workstation and dedicated computer, and a serial null-modem console cable (for RouterBoard routers).
NetInstall Program Parameters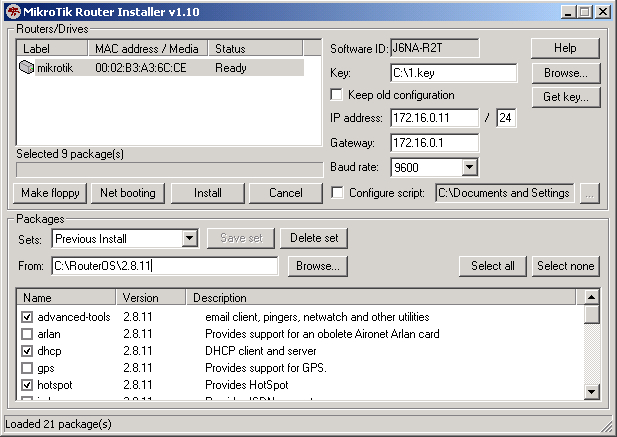
The program runs on Windows 95/98/ME/NT/2000/XP platforms.
Netinstall parameters:
- Routers/Drives - in this list you can see all the devices waiting for installation.
- Software ID - a unique ID that is generated for licensing purposes.
- Key - a key that is generated for the Software ID. When you purchase a license, you get a key file. Click the Browse... button next to the key field to select your key file.
-
Get Key... - obtain software key from MikroTIK server:
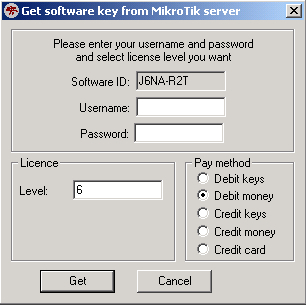
- Software ID - ID for which the key will be generated (depending on the license level).
- Username - client's username in the Account data base.
- Password - client's password.
- Level - license level of RouterOS.
- Debit key - a key that you have paid for, but haven't generated yet.
- Debit money - money that you have on your account. To add money to your account, use the 'add debit' link in the account server.
- Credit key - a key that you can take now, but pay later.
- Credit money - paying with credit money allows you to get your keys now and pay for them later.
- Keep old configuration - used for reinstalling the software. If checked, the old configuration on the router will not be overwritten, otherwise it will be lost.
- IP address/mask - address with subnet mask that will be assigned to ether1 interface after the packages are installed.
- Gateway - specifies the default gateway (static route).
- Baud rate - this baud rate will be set for serial console (bps).
- Configure script - a RouterOS script to execute after the package installation. Note that not all the devices (especially, wireless cards) may be discovered at the time this script is run, so it is suggested to put a delay (about 20 seconds) at the start of the script to be sure that all devices are up and running.
- Make floppy - make a bootable NetInstall floppy.
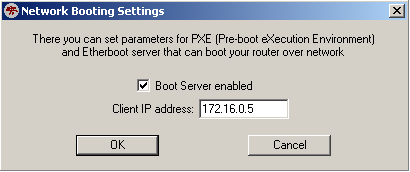
- Net booting - opens the Network Booting Settings window. Enter an IP address from your local network. This address will be temporarily assigned to the computer where RouterOS will be installed on.
- Install - installs the RouterOS on a computer.
- Cancel - cancel the installation.
- Sets - an entry in this list represents the choice of packages selected to install from a directory. If you want to make your own set, browse for a folder that contains packages (*.npk files), select needed packages in the list, and press the Save set button.
- From - type the directory where your packages are stored or press the Browse... button to select the directory.
- Select all - selects all packages in the list
- Select none - unselects all packages in the list
Note: some of the Get key... parameters could not be available for all account types.
NetInstall ExampleThis example shows step-by-step instructions how to install the software on a RouterBoard 200.
-
Connect the routerboard to a switch (or a hub) as it is shown in the diagram using ether1 interface (on RouterBoard 230 it is next to the RS-232 interface):
-
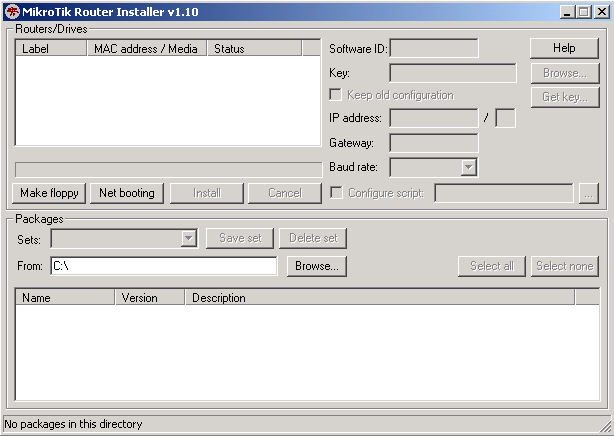
Run NetInstall program on your workstation (you can download it here. It is necessary to extract the packages (*.npk files) on your hard drive.
NetInstall v1.10
-
Enter the Boot Server Client's IP address. Use an address from a network to which belongs your NIC (in this case 172.16.0.0/24). This IP address will be temporarily assigned to the routerboard.
-
Set the RouterBoard to boot from Ethernet interface. To do this, enter the RouterBoard BIOS (press any key when prompted):
RouterBIOS v1.3.0 MikroTik (tm) 2003-2004

RouterBOARD 230 (CPU revision B1)
CPU frequency: 266 MHz
  Memory size:  64 MB

Press any key within 1 second to enter setup.
You will see a list of available commands. To set up the boot device, press the 'o' key:
 RouterBIOS v1.3.0
What do you want to configure?
   d - boot delay
   k - boot key
   s - serial console
   l - debug level
   o - boot device
   b - beep on boot
   v - vga to serial
   t - ata translation
   p - memory settings
   m - memory test
   u - cpu mode
   f - pci back-off
   r - reset configuration
   g - bios upgrade through serial port
   c - bios license information
   x - exit setup
your choice: o - boot device
Press the 'e' key to make the RouterBoard to boot from Ethernet interface:
Select boot device:
 * i - IDE
   e - Etherboot
   1 - Etherboot (timeout 15s), IDE
   2 - Etherboot (timeout  1m), IDE
   3 - Etherboot (timeout  5m), IDE
   4 - Etherboot (timeout 30m), IDE
   5 - IDE, try Etherboot first on next boot (15s)
   6 - IDE, try Etherboot first on next boot (1m)
   7 - IDE, try Etherboot first on next boot (5m)
   8 - IDE, try Etherboot first on next boot (30m)
your choice: e - Etherboot
When this is done, the RouterBoard BIOS will return to the first menu. Press the 'x' key to exit from BIOS. The router will reboot.
-
When booting up, the RouterBoard will try to boot from its Ethernet device. If successful, the Workstation will give to this RouterBoard an IP address, specified in Network Booting Settings. After this process, the RouterBoard will be waiting for installation.
On the workstation, there will appear a new entry in Routers/Drives list:
You can identify the router by MAC address in the list. Click on the desired entry and you will be able to configure installation parameters.
When done, press the Install button to install RouterOS.
- When the installation process has finished, press 'Enter' on the console or 'Reboot' button in the NetInstall program. Remember to set the boot device back to IDE in the RouterBoard BIOS.