The MikroTik router can act as an ISDN client for dialing out, or as an ISDN server for accepting incoming calls. The dial-out connections may be set as dial-on-demand or as permanent connections (simulating a leased line). The remote IP address (provided by the ISP) can be used as the default gateway for the router.
Appropriate packages have to be downloaded from MikroTik’s web page www.mikrotik.com. After all, the ISDN driver should be loaded using the /driver add command.
ISDN channels are added to the system automatically when the ISDN card driver is loaded. Each channel corresponds to one physical 64K ISDN data channel.
The list of available ISDN channels can be viewed using the /isdn-channels print command. The channels are named channel1, channel2, and so on. E.g., if you have two ISDN channels, and one of them currently used by an ISDN interface, but the other available, the output should look like this:
[admin@MikroTik] isdn-channels> print
Flags: X - disabled, E - exclusive
  #    NAME                     CHANNEL    DIR.. TYPE  PHONE
  0    channel1                 0
  1    channel2                 1
[admin@MikroTik] isdn-channels>
ISDN channels are very similar to PPP serial ports. Any number of ISDN interfaces can be configured on a single channel, but only one interface can be enabled for that channel at a time. It means that every ISDN channel is either available or used by an ISDN interface.
In Euro-ISDN a subscriber can assign more than one ISDN number to an ISDN line. For example, an ISDN line could have the numbers 1234067 and 1234068. Each of these numbers can be used to dial the ISDN line. These numbers are referred to as Multiple Subscriber Numbers (MSN).
A similar, but separate concept is EAZ numbering, which is used in German ISDN networking. EAZ number can be used in addition to dialed phone number to specify the required service.
For dial-out ISDN interfaces, MSN/EAZ number specifies the outgoing phone number (the calling end). For dial-in ISDN interfaces, MSN/EAZ number specifies the phone number that will be answered. If you are unsure about your MSN/EAZ numbers, leave them blank (it is the default).
For example, if your ISDN line has numbers 1234067 and 1234068, you could configure your dial-in server to answer only calls to 1234068, by specifying 1234068 as your MSN number. In a sense, MSN is just your phone number.
ISDN client interfaces can be added using the add command:
[admin@MikroTik] interface isdn-client> add msn="142" user="test" \
\... password="test" phone="144" bundle-128K=no
[admin@MikroTik] interface isdn-client> print
Flags: X - disabled, R - running
  0 X  name="isdn-out1" mtu=1500 mru=1500 msn="142" user="test"
       password="test" profile=default phone="144" l2-protocol=hdlc
       bundle-128K=no dial-on-demand=no add-default-route=no use-peer-dns=no

[admin@MikroTik] interface isdn-client>
[admin@MikroTik] interface isdn-server> add msn="142" bundle-128K=no
[admin@MikroTik] interface isdn-server> print
Flags: X - disabled, R - running
  0 X  name="isdn-in1" mtu=1500 mru=1500 msn="142"
       authentication=mschap2,chap,pap profile=default l2-protocol=x75bui
       bundle-128K=no

[admin@MikroTik] interface isdn-server>
Let's assume you would like to set up a router that connects your local LAN with your ISP via ISDN line. First you should load the corresponding ISDN card driver. Supposing you have an ISDN card with a W6692-based chip:
[admin@MikroTik]> /driver add name=w6692
Now additional channels should appear. Assuming you have only one ISDN card driver loaded, you should get following:
[admin@MikroTik] isdn-channels> print
Flags: X - disabled, E - exclusive
  #    NAME                       CHANNEL    DIR.. TYPE  PHONE
  0    channel1                   0
  1    channel2                   1
[admin@MikroTik] isdn-channels>
Suppose you would like to use dial-on-demand to dial your ISP and automatically add a default route to it. Also, you would like to disconnect when there is more than 30s of network inactivity. Your ISP's phone number is 12345678 and the user name for authentication is 'john'. Your ISP assigns IP addresses automatically. Add an outgoing ISDN interface and configure it in the following way:
[admin@mikrotik]> /interface isdn-client add name="isdn-isp" phone="12345678"
user="john" password="31337!)" add-default-route=yes dial-on-demand=yes
[admin@MikroTik] > /interface isdn-client print
Flags: X - disabled, R - running
  0 X  name="isdn-isp" mtu=1500 mru=1500 msn="" user="john" password="31337!)"
       profile=default phone="12345678" l2-protocol=hdlc bundle-128K=no
       dial-on-demand=yes add-default-route=yes use-peer-dns=no
Configure PPP profile.
[admin@MikroTik] ppp profile> print
Flags: * - default
  0 * name="default" local-address=0.0.0.0 remote-address=0.0.0.0
      session-timeout=0s idle-timeout=0s use-compression=no
      use-vj-compression=yes use-encryption=no require-encyrption=no only-one=no
      tx-bit-rate=0 rx-bit-rate=0 incoming-filter="" outgoing-filter=""

[admin@Mikrotik] ppp profile> set default idle-timeout=30s
(If you would like to remain connected all the time, i.e., as a leased line,
then set the idle-timeout to 0s.)
All that remains is to enable the interface:
[admin@MikroTik] /interface set isdn-isp disabled=noYou can monitor the connection status with the following command:
[admin@MikroTik] /interface isdn-client monitor isdn-isp
Let us assume you would like to configure a router for accepting incoming ISDN calls from remote clients. You have an ethernet card connected to the LAN, and an ISDN card connected to the ISDN line. First you should load the corresponding ISDN card driver. Supposing you have an ISDN card with an HFC chip:
[admin@MikroTik] /driver add name=hfcNow additional channels should appear. Assuming you have only one ISDN card driver loaded, you should get the following:
[admin@MikroTik] isdn-channels> print
Flags: X - disabled, E - exclusive
  #    NAME                       CHANNEL    DIR.. TYPE  PHONE
  0    channel1                   0
  1    channel2                   1
[admin@MikroTik] isdn-channels>
Add an incoming ISDN interface and configure it in the following way:
[admin@MikroTik] interface isdn-server> add msn="7542159" \
\... authentication=chap,pap bundle-128K=no
[admin@MikroTik] interface isdn-server> print
Flags: X - disabled
  0 X  name="isdn-in1" mtu=1500 mru=1500 msn="7542159" authentication=chap,pap
       profile=default l2-protocol=hldc bundle-128K=no
Configure PPP settings and add users to router's database.
[admin@MikroTik] ppp profile> print
Flags: * - default
  0 * name="default" local-address=0.0.0.0 remote-address=0.0.0.0
      session-timeout=0s idle-timeout=0s use-compression=no
      use-vj-compression=yes use-encryption=no require-encyrption=no only-one=no
      tx-bit-rate=0 rx-bit-rate=0 incoming-filter="" outgoing-filter=""
[admin@Mikrotik] ppp profile> set default idle-timeout=5s local-address=10.99.8.1 \
\... remote-address=10.9.88.1
Add user 'john' to the router's user database. Assuming that the password is '31337!)':
[admin@MikroTik] ppp secret> add name=john password="31337!)" service=isdn
[admin@MikroTik] ppp secret> print
[admin@ISDN] ppp secret> print
Flags: X - disabled
  #   NAME              SERVICE CALLER-ID        PASSWORD         PROFILE
  0   john              isdn                     31337!)          default
[admin@MikroTik] ppp secret>
Check the status of the ISDN server interface and wait for the call:
[admin@MikroTik] interface isdn-server> monitor isdn-in1

    status: Waiting for call...
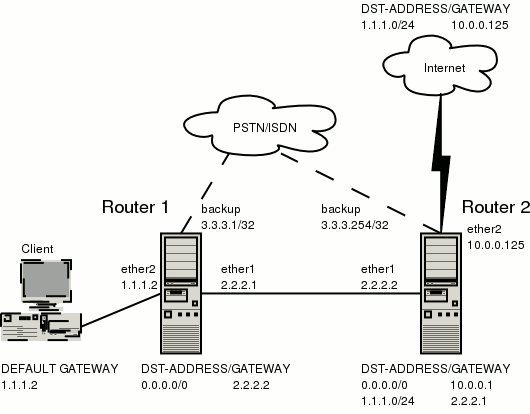
The backup system example is shown in the following picture:
In this case the backup interface is an ISDN connection, but in real applications it can be substituted by a particular connection.
Follow the instructions below on how to set up the backup link:
To use ISDN, the ISDN card driver must be loaded:
[admin@MikroTik] driver> add name=hfcThe PPP connection must have a new user added to the routers one and two:
[admin@Mikrotik] ppp secret> add name=backup password=backup service=isdnAn ISDN server and PPP profile must be set up on the second router:
[admin@MikroTik] ppp profile> set default local-address=3.3.3.254 remote-address=3.3.3.1
[admin@MikroTik] interface isdn-server> add name=backup msn=7801032
An ISDN client must be added to the first router:
[admin@MikroTik] interface isdn-client>
add name=backup user="backup" password="backup" phone=7801032 msn=7542159
Use the /ip route add command to add the required static routes and comments to them. Comments are required for references in scrips.
The first router:
[admin@Mikrotik] ip route> add gateway 2.2.2.2 comment "route1"
The second router:
[admin@Mikrotik] ip route> add gateway 2.2.2.1 comment "route1" dst-address 1.1.1.0/24
Add scripts in the submenu \system script using the following commands:
The first router:
[admin@Mikrotik] system script> add name=connection_down \
\... source={/interface enable backup; /ip route set route1 gateway 3.3.3.254}
[admin@Mikrotik] system script> add name=connection_up \
\... source={/interface disable backup; /ip route set route1 gateway 2.2.2.2}
The second router:
[admin@Mikrotik] system script> add name=connection_down \
\... source={/ip route set route1 gateway 3.3.3.1}
[admin@Mikrotik] system script> add name=connection_up \
\... source={/ip route set route1 gateway 2.2.2.1}
Add the following settings to the first router:
[admin@Mikrotik] tool netwatch> add host=2.2.2.1 interval=5s \
\... up-script=connection_up down-script=connection_down
Add the following settings to the second router:
[admin@Mikrotik] tool netwatch> add host=2.2.2.2 interval=5s \
\... up-script=connection_up down-script=connection_down