HotSpot Gateway
Document revision 1.31 (08-Oct-2003)
This document applies to MikroTik RouterOS v2.7
Table of Contents
- Table of Contents
- Summary
- Specifications
- Related Documents
- Description
- HotSpot Gateway Setup
- HotSpot Server Settings
- HotSpot AAA
- HotSpot Cookies
- Customizing Hotspot Servlet
- Resetting Hotspot Servlet customizations
- Question&Answer-Based Setup
- HotSpot Step-by-Step User Guide
- Troubleshooting
Summary
The MikroTik HotSpot Gateway enables provision of public network access for clients using wireless or wired network connections.
HotSpot Gateway features:
- authentication of clients using local client database, or RADIUS server
- accounting using local log database, or RADIUS server
- HotSpot Gateway can provide access for authorized clients using two different methods
- dhcp-pool method uses DHCP server to assign temporary (not valid in outer networks) IP addresses to clients prior to authentication. After successful authentication the DHCP server assigns address to client from different pool. This method may be used to assign a fixed IP address to each user (i.e. no matter which computed does the user use, he/she will always use the same IP address)
- enabled-address method enables traffic for authorized clients without IP address change
- traffic and connection time accounting
- clients can be limitated by
- download/upload speed (tx/rx bitrate)
- connection time
- downloaded/uploaded traffic (bytes)
Universal Clinet feature may be used with HotSpot enabled-address method to provide IP network services regardless of client computers' IP network settings.
Specifications
Packages required : hotspot, dhcp(optional, required by dhcp-pool method),
web-proxy (optional)
License required : Basic plus any additional (limited to 4 active users otherwise)
Home menu level : /ip hotspot
Protocols utilized : ICMP (RFC792),
DHCP (RFC2131)
Hardware usage: not significant
Related Documents
Software
Package Installation and Upgrading
IP Addresses
and Address Resolution Protocol (ARP)
IP Pools
DHCP Client and DHCP Server
General Point to Point Settings
Firewall
Filters and Network Address Translation (NAT)
Log Management
Authentication, Authorization and Accounting
Certificate Management
Description
MikroTik HotSpot Gateway should have at least two network interfaces:
- HotSpot interface, which is used to connect HotSpot clients;
- LAN/WAN interface, which is used to access network resources. For example, DNS and RADIUS server(s) should be accessible.
The diagram below shows sample HotSpot setup.

The HotSpot interface should have an IP address assigned to it. To use dhcp-pool method, there should be two IP addresses: one as gateway for the temporary address pool prior to authentication, and second as gateway for the permanent address pool used for authenticated clients. Note, that you have to provide routing for these address pools, unless you plan to use masquerading (source NAT).
Only in dhcp-pool case, the arp feature should be set to reply-only on HotSpot interface to prevent network access using static IP addresses (the DHCP server will add static ARP entries for each DHCP client).
Physical network connection has to be established between the HotSpot user's computer and the gateway. It can be wireless (the wireless card should be registed to AP), or wired (the NIC card should be connected to a HUB or a switch).
Note that Universal Client feature cannot be used with dhcp-pool method.
The Initial Contact
One of two methods may be used for each client individually (you may choose one or allow it to be done automatically). The enabled-address method is preferred, so if it is configured correctly and the client has a proper IP address (that matches the one set in the user database), this method is to be used.
If the enabled-address method is not enabled or the client's IP address should be changed, the HotSpot Gateway tries to use dhcp-pool method. In that case, MikroTik HotSpot Gateway's DHCP server assigns IP addresses from the temporary address pool with a very short lease time (approx. 14s), so the address can be changed after authentication.
If user tries to access network resources using web browser, the destination NAT rule redirects all TCP connection requests to HotSpot service (port 8088 by default). This brings up the HotSpot Welcome/Login page.
It may be useful to have port 80 for HotSpot service because the users might want to see status and log out pages. If this is impossible, you may assign virtual IP address for hotspot service. It is done by redirecting all requests going to that virtual IP to hotspot service.
Note that you may want to have DNS traffic enabled (or redirected to the router's DNS cache) so that the client could be logged in connecting any valid web-page (using it's DNS name). Enabling ICMP ping might be useful as well, since it shows network connectivity. Other traffic should be dropped.
The Servlet
If user is not logged in, login page will be shown (where username and password has to be entered), but if user is logged in, status page will be shown (status: username, IP address, session time, bytes and packets transferred, ...). There are 6 HTML pages that can be easily modified by creating HTML template pages and uploading them to the hotspot folder on MikroTik router. These pages are called 'servlet' in this document and are described in detailes later on.
Authentication
Going to any HTTP address with web browser will be redirected to HotSpot authentication page prompting for username and password. Password together with HotSpot generated challenge string is hashed using MD5 algorithm (which in this case is implemented using JavaScript) and is executed on client's computer by web browser. After that, the hash result together with username is sent over Ethernet network to HotSpot service. So, password is never sent in plain text over ip network.
Note that password encryption is the reason why web browsers, that do not support JavaScript (for example, Internet Explorer 2.0), will not be able to authenticate users. It is possible to allow unencrypted passwords to be accepted, but it is not recommended to use this feature.
HotSpot can authenticate users using local user database or a RADIUS server (local database if consupled first, then - RADIUS server)
If authentication is done locally, profile corresponding to that user is used, otherwise (in case of RADIUS) default profile is used to set default values for parameters, which are not set in RADIUS access-accept message.
If authentication by http cookie is enabled, then after each successful login cookie is sent to web browser and the same cookie is added to active HTTP cookie list. Next time user will try to log in, web browser will send http cookie. This cookie will be compared to the one on HotSpot and only if there is the same source MAC address and the same randomly generated ID, user is automatically logged in. New cookie with different random ID is sent to web browser. Old cookie is removed from local HotSpot active cookie list. New one with new expire time is added.
Address Assignment with dhcp-pool Method
When user is successfully authenticated, HotSpot assigns another IP address for client (static or from some IP pool). On next clients DHCP request, the new IP address will be given by DHCP server to this client. How much time this IP address change requires, depends on DHCP lease time for non authenticated users. HotSpot login-delay parameter should be set accordingly to this DHCP server lease time. If lease time is 10s, then real login-delay will be about 1..7 seconds. So, it is quite safe to set login-delay to 8s in this case.
While IP address is changed, user sees after-login (alogin.html) page. This page will automatically forward user to original destination address (or status page, if there was no original dst address) after login-delay time will pass.
Logging Out
User can log out using status page. There is a link to http://HotSpot-IP/logout Going to this page will logout user. After that logout page (logout.html) will be shown to user.
HotSpot Gateway Setup
Submenu level : /ip hotspot
[admin@MikroTik] ip hotspot> print
                        use-ssl: no
                hotspot-address: 0.0.0.0
                       dns-name: ""
             status-autorefresh: 1m
                universal-proxy: no
                       auth-mac: no
              auth-mac-password: no
               auth-http-cookie: no
           http-cookie-lifetime: 1d
    allow-unencrypted-passwords: no
              split-user-domain: no
[admin@MikroTik] ip hotspot>
Property Description
use-ssl (yes | no, default: no) - whether the servlet allows only HTTPS:
- yes - the regintration may only occur using the Secure HTTP (HTTPS) protocol
- no - the registration may be accomplished using both HTTP and HTTPS protocols
status-autorefresh (time, default: 1m) - WWW status page autorefresh time
universal-proxy (yes | no; default: no) - whether to intercept the requests to HTTP proxy servers
auth-mac (yes | no, default: no) - defines whether authentication by ethernet MAC address is enabled
auth-mac-password (yes | no, default: no) - uses MAC address as password if MAC authorization is enabled
auth-http-cookie (yes | no, default: no) - defines whether HTTP authentication by cookie is enabled
http-cookie-lifetime (time, default: 1d) - validity time of HTTP cookies
allow-unencrypted-passwords (yes | no; default: no) - whether to authenticate user if plain-text password is received
split-user-domain (yes | no; default: no) - whether to split username from domain name when the username is given in "user@domain" or in "domain\user" format
Notes
If dns-name property is not specified, hotspot-address is used instead. If hotspot-address is also absent, then both are to be detected automatically.
If auth-mac is enabled, then client is not prompted for username and password if the MAC address of this computer is in the user database (either local or on RADIUS). Nevertheless this method does not excuse clients from the common login procedure, just from filling out the registration form (i.e. regardless of whether MAC authorization is applicable for a client, he/she should open the Login page in order to get registred)
universal-proxy requires web-proxy software package. This feature automatically creates DST-NAT rules to redirect requests of each particular user to a proxy server he/she is using (it may be set in his/her settings to use an unknown to us proxy server) to the local proxy server. To get it work you shuold have web proxy server up and running. This feature may be used in combination with Universal Client feature to provide Internet access for users regardless of their network settings.
If you are using a parent proxy with universal proxy feature, you should add a rule to the Direct Access list for each IP address HotSpot is running on allowing the requests destined to the local HotSpot server to be resolved directly by the local web proxy. For example, if the HotSpot server is running on 10.0.0.1 address:
/ip web-proxy direct add dst-address=10.0.0.1/32 action=allow
allow-unencrypted-passwords property makes it possible to authenticate with the browsers not supporting JavaScript. It is also possible to log-in using telnet connection, just requesting the page /login?user=username&password=password. An another use of this property is the possibility of hard-coded authentication information in the servlet's login page simply creating the appropriate link.
The domain get from the username (enabling split-user-domain property) is used later in AAA process (for example, to specify different RADIUS servers for authentication depending on domain name)
Example
To enable cookie support:
[admin@MikroTik] ip hotspot> set auth-http-cookie=yes
[admin@MikroTik] ip hotspot> print
                        use-ssl: no
                hotspot-address: 0.0.0.0
                       dns-name: ""
             status-autorefresh: 1m
                universal-proxy: no
                       auth-mac: no
              auth-mac-password: no
               auth-http-cookie: yes
           http-cookie-lifetime: 1d
    allow-unencrypted-passwords: no
              split-user-domain: no
HotSpot Server Settings
Submenu level : /ip hotspot server
Property Description
name (name, default: "") - server profile name
dhcp-server (name) - DHCP server with which to use this profile
lease-time (time, default: 1m) - DHCP lease time for logged in user
login-delay (time, default: 10s) - Time required to log in user
address-pool (name) - IP pool name, from which HotSpot client will get IP address
if it is not given some static already
netmask (integer, default: 0)- network mask
gateway (IP address, default: 0.0.0.0) - default gateway
Notes
This configuration is ignored by enabled-address method.
There can be added one server for each DHCP server. Which server profile to apply will depend on DHCP server which gave DHCP lease to that client. Actually it means that if user will log in from different interfaces, then different server profiles will be used. It allows assigning different IP addresses on different ethernet interfaces.
Example
To add hotspot server named dhcp1 to the DHCP server hotspot-dhcp giving IP addresses from the hotspot pool with network mask 24 and gateway address 10.0.0.1:
[admin@MikroTik] ip hotspot server> add name=dhcp1 dhcp-server=hotspot-dhcp \
\... address-pool=hotspot netmask=24 gateway=10.0.0.1
[admin@MikroTik] ip hotspot server> print
  0 name="dhcp1" dhcp-server=hotspot-dhcp lease-time=1m login-delay=10s
    address-pool=hotspot netmask=24 gateway=10.0.0.1

[admin@MikroTik] ip hotspot server>
HotSpot AAA
HotSpot User Profiles
Submenu level : /ip hotspot profile
Description
User profiles are used for common user settings. Profiles are like user groupes, they are grouping users with the same limits
Property Descriptions
name (name) - profile name
session-timeout (time, default: 0s) - session timeout (maximal session time) for client
idle-timeout (time, default: 0s) - idle timeout (maximal period of inactivity) for client
only-one (yes | no, default: yes) - only one simultaneous login per user
tx-bit-rate (integer, default: 0) - transmit bitrate
- 0 - no limitation
- 0 - no limitation
outgoing-filter (name, default: "") - firewall chain name for outgoing packets
mark-flow (name, default: "") - traffic from logged in users will be marked by firewall mangle with this flow name
login-method (dhcp-pool | enabled-address | smart, default: smart) - the login method user will be using:
- dhcp-pool - login by changing IP address via DHCP server
- enabled-address - login by enabling access for client's existing IP address
- smart - choose best login method for each case
Notes
To use enabled-address method, mark-flow should be set
To use dhcp-pool method, dhcp software package should be installed
idle-timeout is used to detect, that client is not using outer networks ( e.g. Internet), i.e., there is NO TRAFFIC coming from that client and going through the router. keepalive-timeout is used to detect, that the computer of the client is still alive and reachable. Server will check client's reachability. If check will fail during this period, client will be logged out.
Example
To use enabled-address method that uses logged-in mark and logs a client off if he disappears for more then a minute:
[admin@MikroTik] ip hotspot profile> set default login-method=enabled-address \
\... mark-flow=logged-in keepalive-timeout=1m
[admin@MikroTik] ip hotspot profile> print
Flags: * - default
  0 * name="default" session-timeout=0s idle-timeout=0s only-one=yes
      tx-bit-rate=0 rx-bit-rate=0 incoming-filter="" outgoing-filter=""
      mark-flow="logged-in" login-method=enabled-address keepalive-timeout=1m


[admin@MikroTik] ip hotspot profile>
To define an additional profile that also limits download speed to 64 kilobyte/s and upload data rate to 32 kilobyte/s, and call it limited:
[admin@MikroTik] ip hotspot profile> add copy-from=default tx-bit-rate=65536 rx-
bit-rate=32768 name=limited
[admin@MikroTik] ip hotspot profile> print
Flags: * - default
  0 * name="default" session-timeout=0s idle-timeout=0s only-one=yes
      tx-bit-rate=0 rx-bit-rate=0 incoming-filter="" outgoing-filter=""
      mark-flow="logged-in" login-method=enabled-address keepalive-timeout=1m


  1   name="limited" session-timeout=0s idle-timeout=0s only-one=yes
      tx-bit-rate=65536 rx-bit-rate=32768 incoming-filter=""
      outgoing-filter="" mark-flow="logged-in" login-method=enabled-address
      keepalive-timeout=1m


[admin@MikroTik] ip hotspot profile>
HotSpot Users
Submenu level : /ip hotspot user
Property Description
name (name) - user name
password (string, default: "") - user password
address (IP address, default: 0.0.0.0) - static IP address. If not 0.0.0.0,
client will get always the same IP address. It implies, that only one simultaneous login
for that user is allowed
mac-address (MAC address, default: 00:00:00:00:00:00) - static MAC address.
If not 00:00:00:00:00:00, client is allowed to login only from that MAC address
profile (name, default: default) - user profile
routes (string, default: "") - routes that appear on the server when the client is connected.
The route format is: "dst-address gateway metric" (for example, "10.1.0.0/ 24 10.0.0.1 1").
Several routes may be specified separated with commas
limit-uptime (time, default: 0s) - total uptime limit for user (pre-paid time)
limit-bytes-in (integer, default: 0) - maximum amount of bytes user can transmit
limit-bytes-out (integer, default: 0)- maximum amount of bytes user can receive
Notes
MAC address should be written in CAPITAL letters
If auth-mac parameter is enabled, clients' MAC addresses (written with CAPITAL letters) can be used as usernames. If auth-mac-password is set to no, there should be no password for that users. In the other case, the password should be equal to the username. When client is connecting, it's MAC address is checked first. If there is a user with that MAC address, the client is authenticated as this user. If there is no match, client is asked for username and password.
The address property is used only for dhcp-pool login method to tell it DHCP server. If a user already has a permanent IP address (as it is happening when enabled-address method is used), this property will just be ignored.
The byte limits are total limits for each user (not for each session as at /ip hotspot active). So, if user has already downloaded something, then session limit will be total limit - (minus) already downloaded. For example, if download limit for user is 100MB and user has already downloaded 30MB, then session download limit after login at /ip hotspot active will be 100MB - 30MB = 70MB.
If user will reach his limits (bytes-in >= limit-bytes-in or bytes-out >= limit-bytes-out), he will not be able to log on anymore.
Example
To add user Ex with password Ex that is allowed to log in only with 01:23:45:67:89:AB MAC address and is limited to 1 hour of work:
[admin@MikroTik] ip hotspot user> add name=Ex password=Ex \
\... mac-address=01:23:45:67:89:AB limit-uptime=1h
[admin@MikroTik] ip hotspot user> print
Flags: X - disabled
  #   NAME        ADDRESS         MAC-ADDRESS       PROFILE     UPTIME
  0   Ex          0.0.0.0         01:23:45:67:89:AB default     0s
[admin@MikroTik] ip hotspot user> print detail
Flags: X - disabled
  0   name="Ex" password="Ex" address=0.0.0.0 mac-address=01:23:45:67:89:AB
      profile=default routes="" limit-uptime=1h limit-bytes-in=0
      limit-bytes-out=0 uptime=0s bytes-in=0 bytes-out=0 packets-in=0
      packets-out=0


[admin@MikroTik] ip hotspot user>
HotSpot Active Users
Submenu level : /ip hotspot active
Description
The active user list shows the list of currently logged in users. Nothing can be changed here, except user can be logged out with the remove command
Property Description
Statistics:
user (name) - name of user logged in
domain (string) - domain of logged-in user (if split from username)
address (IP address) - IP address of logged in user
uptime (time) - current session time (logged in time) for this IP address
session-timeout (time) - how much time it is left for IP address until it will
be automatically logged out
idle-timeout (time) - how much idle time it is left for IP address until it will
be automatically logged out
Example
To get the list of active users:
[admin@MikroTik] ip hotspot active> print
Flags: R - radius, H - DHCP
  #    USER        ADDRESS         UPTIME          SESSION-TIMEOUT IDLE-TIMEOUT
  0    Ex          10.0.0.144      4m17s           55m43s
[admin@MikroTik] ip hotspot active>
HotSpot User Statistics
Command name : /ip hotspot user print stats
Property Description
Statistics:
uptime (time)- total time user has been logged in
bytes-in (integer) - total bytes received from user
bytes-out (integer) - total bytes sent to user
packets-in (integer) - total packets received from user
packets-out (integer) - total packets sent to user
Notes
These stats are updated if user is authenticated via local user databese each time user logs out. It means, that if user is currently logged in, then these stats will not show current total values. Use /ip hotspot active print stats to produce statistics on current user sessions.
Example
To get the list of active users:
[admin@MikroTik] ip hotspot user> print stats
Flags: X - disabled
  #   NAME         UPTIME          BYTES-IN   BYTES-OUT  PACKETS-IN PACKETS-OUT
  0   Ex           5m5s            0          0          0          0
[admin@MikroTik] ip hotspot user>
HotSpot Remote AAA
Submenu level : /ip hotspot aaa
[admin@MikroTik] ip hotspot aaa> print
        use-radius: no
        accounting: yes
    interim-update: 0s
[admin@MikroTik] ip hotspot aaa>
Property Description
use-radius (yes | no, default: no) - whether user database in a RADIUS
server should be consulted
accounting (yes | no, default: yes) - whether RADIUS accounting is used
interim-update (time, default: 0s) - Interim-Update time interval
Notes
RADIUS user database is consulted only if the required username is not found in local user database
Example
To enable RADIUS AAA:
[admin@MikroTik] ip hotspot aaa> set use-radius=yes
[admin@MikroTik] ip hotspot aaa> print
        use-radius: yes
        accounting: yes
    interim-update: 0s
[admin@MikroTik] ip hotspot aaa>
HotSpot Cookies
Submenu level : /ip hotspot cookie
Property Description
Statistics:
user (name) - username
domain (string) - domain name (if split from username)
mac-address (MAC address) - client's MAC address
expires-in (time) - how long the cookie is valid
Example
To get the list of valid cookies:
[admin@MikroTik] ip hotspot cookie> print
  # USER               DOMAIN            MAC-ADDRESS       EXPIRES-IN
  0 Ex                                   01:23:45:67:89:AB 23h54m16s
[admin@MikroTik] ip hotspot cookie>
Customizing Hotspot Servlet
Description
There are 6 HTML pages to interact with hotspot client:
- login.html - login page
- status.html - status page for logged in user
- logout.html - after-logged-out page
- error.html - various error messages
- redirect.html - redirecting web browser to another url
- alogin.html - page, which is shown after successful login while client gets new IP address from DHCP server (for 10 seconds or so)
There are many possibilities to customize what the hotspot authentication pages look like:
- The pages are easily modifiable. They are stored on the router's FTP server in hotspot directory.
- By changing the variables, which client sends to the HotSpot servlet, it is possible to reduce keyword count to one (username or password; the client's MAC address may be used as the other value) or even to zero (License Agreement; some predefined values general for all users or client's MAC address may be used as username and password)
- Registration may occur on a different server. Client's MAC address may be passed to it, so that this information need not be written in manually. After the registration, the server may change RADIUS database enabling client to log in.
Variable Description
All of the pages use variables to show user specific values. For each variable there is an example included in brackets.
Common variables (available in all pages):
- hostname - IP address for hotspot www access ("10.5.50.1")
- link-logout - link to logout page ("http://10.5.50.1/logout")
- link-login - link to login page ("http://10.5.50.1/login?dst=http://www.mikrotik.com/")
- link-status - link to status page ("http://10.5.50.1/status")
- link-orig - link to original destination page ("http://www.mikrotik.com/")
- session-id - value of 'session-id' parameter in last request
- var - value of 'var' parameter in last request
Page specific variables:
- redirect.html:
- link-redirect - page to which redirect has to be done (for example, "http://www.mikrotik.com/")
- login.html:
- mac - MAC address ("01:23:45:67:89:AB")
- error - error message, if previous login failed ("invalid username or password")
- input-user - name and value of username input field ("name=user value=john")
- input-password - name of password input field ("name=password")
- input-popup - name and value of popup input field ("name=popup checked")
- form-input - name of input form and login JavaScript for password encoding ("name=login onSubmit=...")
- main - MD5 encryption JavaScript and form for encrypted password
- user - value of username input field ("john")
- domain - value of domain ("mikrotik")
- popup - value of pop-up checkbox ("true")
- chap-id - value of chap ID ("\371")
- chap-challenge - value of chap challenge ("\357\015\330\013\021\234\145\245\303\253\142\246\133\175\375\316")
- alogin.html:
- link-redirect - page to which redirect has to be done (for example, "http://www.mikrotik.com/")
- login-time - time in seconds after which redirect has to be done ("9")
- popup - true if alogin.html should pop-up status page in new window, false - otherwise
- status.html, logout.html: information on logged in user
- username - name ("john")
- ip - IP address ("192.168.0.222")
- mac - MAC address ("01:23:45:67:89:AB")
- uptime - session uptime ("10h2m33s")
- session-timeout - session timeout left for user ("5h" or "---" if none)
- session-valid-till - date and time when session will expire ("Sep/21/2002 16:12:33" or "---" if there is no session-timeout)
- idle-timeout - idle timeout ("20m" or "---" if none)
- bytes-in - number of bytes received from client ("15423")
- bytes-out - number of bytes sent to client ("11352")
- packets-in - number of packets received from client ("251")
- packets-out - number of packets sent to client ("211")
- status.html:
- refresh-time - time in seconds after which to automatically refresh status page
- refresh-time-str - more friendly representation of refresh-time
- error.html:
- error - error message ("DHCP lease not found")
Note that the resulting password to be sent to the HotSpot gateway is formed MD5-hashing the concatenation of the following: chap-id, the password of the user and chap-challange (in the given order).
To insert variable in some place in HTML file, variable name surrounded by % symbols is used. For example, to show link to login page, following construction can be used:
<a href="%link-login%">login</a>
It can be used in any hotspot HTML file.
Note, that to insert % symbol as a text (not as a part of variable construction), "%%" has to be used (if there is only one % symbol on a page or string between it and next % symbol is not a valid variable name, % may be used with the same result).
Examples
With basic HTML language knowledge and the information below it should be easy to implement the ideas described above
- To provide predefined value as username, in login.html change:
<input type="text" %input-user%>
to this line:<input type="hidden" name="user" value="hsuser">
(where hsuser is the username you are providing) - To provide predefined value as password, in login.html change:
<input type="password" %input-password%>
to this line:<input type="hidden" name="password" value="hspass">
(where hspass is the password you are providing) - To send client's MAC address to a registration server in form of:
https://www.server.serv/register.html?mac=XX:XX:XX:XX:XX:XX
change the Login button link in login.html to:https://www.server.serv/register.html?mac=%mac%
(you should correct the link to point to your server) - To show a banner after user login, in alogin.html after
if ('%popup%' == 'true') newWindow();add the folowing line:open('http://your.web.server/your-banner-page.html', 'my-banner-name','');(you should correct the link to point to the page you want to show) - To choose different page shown after login, in login.html change:
<input type="hidden" name="dst" value="%link_orig%">
to this line:<input type="hidden" name="dst" value="http://your.web.server">
(you should correct the link to point to your server)
Resetting Hotspot Servlet customizations
Command name : /ip hotspot reset-html
Description
The command overwrites the existing hotspot servlet with the original HTML files. It is used if you have changed the servlet and it is not working after that.
Example
To reset hotspot servlet html pages:
[admin@MikroTik] ip hotspot> reset-html
Current hotspot html pages will be lost! Reset anyway? [y/N]: y
[admin@MikroTik] ip hotspot>
Question&Answer-Based Setup
Command name : /ip hotspot setup
Questions
hotspot interface (name) - interface to run HotSpot on
interface already configured (yes | no) - whether to add hotspot
authentication for existing interface setup or interface setup should be
configured from the scrach
enable universal client (yes | no; default: no) - whether to
enable Universal Clinet on HotSpot interface
login method (dhcp-pool | enabled-address | smart; default: enabled-
address) - login method to use
local address of temporary network (IP address/mask; default: 192.168.0.1/24)
- temporary HotSpot address for interface (for dhcp-pool method)
masquerade temporary network (yes | no; default: yes) - whether to
masquerade temporary network
address pool of temporary network (name) - pool for temporary
HotSpot addresses
local address of hotspot network (IP address/mask; default: 10.5.50.1/24)
- HotSpot address for interface
masquerade hotspot network (yes | no; default: yes) - whether to
masquerade HotSpot network
address pool of hotspot network (name) - pool for HotSpot addresses
use ssl (yes | no; default: no) -whether to use secure SSL authentication
import and setup certificate (yes | no; default: yes) - if the setup should try to import and set up a certificate
passphrase (text) - the passphrase of the certificate
select certificate (name) - which cetrificate to use
ip address of smtp server (IP address) - IP address of the SMTP
server to redirect SMTP requests (TCP port 25) to
use local dns cache (yes | no) - whether to redirect all DNS requests ( UDP port 53) to the local DNS cache
dns-server (IP address, IP address) - DNS servers for HotSpot clients
dns name (test) - DNS domain name of the HotSpot gateway
name of local hotspot user (string; default: admin) - username of one automatically created user
password for the user (string; default: "") - password for the automatically created user
another port for service (integer; default: 8081) - another port for www service (so that hotspot service could be put on port 80
use transparent web proxy (yes | no; default: no) - whether to use transparent web proxy for hotspot clients
Notes
Depending on current settings and answers to the previous questions, default values of following questions may be different. Some questions may disappear if they become redundant (for example, there is no use of 'temporary network' when login method is enabled-address)
If Universal Client is enabled, and DNS cache is not used, DNS requests are redirected to the first DNS server configured.
Example
To configure HotSpot on ether1 interface (which is already configured), enabling transparent web proxy and adding user admin with password rubbish:
[admin@MikroTik] ip hotspot> setup
Select interface to run HotSpot on

hotspot interface: ether1
Use SSL authentication?

use ssl: no
Add hotspot authentication for existing interface setup?

interface already configured: yes
Create local hotspot user

name of local hotspot user: admin
password for the user: rubbish
Use transparent web proxy for hotspot clients?

use transparent web proxy: yes
[admin@MikroTik] ip hotspot>
HotSpot Step-by-Step User Guide
dhcp-pool Method
Planning the Configuration
Let us consider following example HotSpot setup:
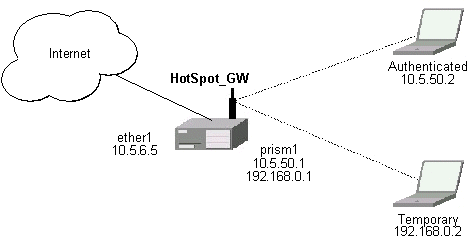
There will be 2 hotspot IP address ranges used for clients on prism1 interface. You are free to choose the address ranges, just make sure you use masquerading for not routed ones. In our example, we are using
- temporary addresses which must be masqueraded:
network: 192.168.0.0/24
gateway: 192.168.0.1
pool: 192.168.0.2-192.168.0.254 - real addresses which require routing:
network: 10.5.50.0/24
gateway: 10.5.50.1
pool: 10.5.50.2-10.5.50.254
Temporary addresses are given out by DHCP server (configured within /ip dhcp-server), but real addresses are given out by hotspot server configuration.
For hotspot client accounting, hotspot will add dynamic firewall rules in firewall hotspot chain. This chain has to be created manually. And all network packets (to/from hotspot clients) have to pass this chain.
Setup Example
Follow the steps below:
- Your ether1 interface is configured with IP address 10.5.6.5/24 and the default route points to gateway 10.5.6.1
- Your prism1 interface is configured for AP mode and can register IEEE 802.11b wireless clients. See the Prism Interface Manual for more details.
- ARP should be set to reply-only on prism interface, so no dynamic
entries are added to the ARP table. DHCP server will add entries
only for clients which have obtained DHCP leases.
/interface prism set prism1 arp=reply-only
- Add two IP addresses to prism1 interface:
/ip address add address=192.168.0.1/24 interface=prism1 \ comment="hotspot temporary network" /ip address add address=10.5.50.1/24 interface=prism1 \ comment="hotspot real network" - add 2 IP pools:
/ip pool add name=hs-pool-temp ranges=192.168.0.2-192.168.0.254
/ip pool add name=hs-pool-real ranges=10.5.50.2-10.5.50.254
- add masquerading rule for temporary IP pool, which is not routed:
/ip firewall src-nat add src-address=192.168.0.0/24 action=masquerade \
    comment="masquereade hotspot temporary network"
Make sure you have routing for authenticated address space. Try to ping 10.5.50.1 from your internet gateway 10.5.6.1, for example. See the Basic Setup Guide on how to set up routing. - Add dhcp server (for temporary IP addresses):
/ip dhcp-server add name="hs-dhcp-server" interface=prism1 lease-time=14s \ address-pool=hs-pool-temp netmask=24 gateway=192.168.0.1 \ dns-server=159.148.60.2,159.148.108.1 domain="mt.lv" add-arp=yes disabled=no - Add hotspot server setup (for real IP addresses):
/ip hotspot server add name=hs-server dhcp-server=hs-dhcp-server \ address-pool=hs-pool-real netmask=24 gateway=10.5.50.1 - Add local hotspot user:
/ip hotspot user add name=Ex password=Ex
- Setup hotspot service to run on port 80 (www service has to be assigned
another port, e.g., 8081):
/ip service set www port=8081
/ip service set hotspot port=80
Note! Changing www service to other port than 80 requires thet you specify the new port when connecting to MikroTik router using WinBox, e.g., use 10.5.50.1:8081 in this case. - Redirect all TCP requests from temporary IP addresses to hotspot service:
/ip firewall dst-nat add src-address=192.168.0.0/24 dst-port=443 protocol=tcp \
    action=redirect to-dst-port=443\
    comment="redirect unauthorized hotspot clients to hotspot service"
/ip firewall dst-nat add src-address=192.168.0.0/24 protocol=tcp \
    action=redirect to-dst-port=80 \
    comment="redirect unauthorized hotspot clients to hotspot service"
Allow DNS requests and ICMP ping from temporary addresses and reject everything else:
/ip firewall add name=hotspot-temp comment="limit unauthorized hotspot clients" /ip firewall rule forward add src-address=192.168.0.0/24 action=jump \ jump-target=hotspot-temp comment="limit access for unauthorized hotspot clients" /ip firewall rule input add src-address=192.168.0.0/24 dst-port=80 \ protocol=tcp action=accept comment="accept requests for hotspot servlet" /ip firewall rule input add src-address=192.168.0.0/24 dst-port=443 \ protocol=tcp action=accept comment="accept request for hotspot servlet" /ip firewall rule input add src-address=192.168.0.0/24 dst-port=67 \ protocol=udp action=accept comment="accept requests for local DHCP server" /ip firewall rule input add src-address=192.168.0.0/24 action=jump \ jump-target=hotspot-temp comment="limit access for unauthorized hotspot clients" /ip firewall rule hotspot-temp add protocol=icmp action=return \ comment="allow ping requests" /ip firewall rule hotspot-temp add protocol=udp dst-port=53 action=return \ comment="allow dns requests" /ip firewall rule hotspot-temp add action=reject \ comment="reject access for unauthorized hotspot clients"- Add hotspot chain:
/ip firewall add name=hotspot comment="account authorized hotspot clients"
- Pass all through going traffic to hotspot chain:
/ip firewall rule forward add action=jump jump-target=hotspot \
    comment="account traffic for authorized hotspot clients"
Note that in order to use SSL authentication, you should install an SSL certificate. This topic is not covered by this manual section. Please see the respective manual section on how to install certificates in MikroTik RouterOS
If client has obtained temporary address, its lease is shown as:
[admin@HotSpot-GW] > ip dhcp-server lease print
Flags: X - disabled, H - hotspot, D - dynamic
  #   ADDRESS         MAC-ADDRESS       EXPIRES-A... SERVER         STATUS
  0 D 192.168.0.254   00:40:96:13:B3:47 8s           hs-dhcp-server bound
[admin@HotSpot-GW] >
After successful authorization its DHCP address is changed, and it is listed under active hotspot users:
[admin@HotSpot-GW] > ip dhcp-server lease print
Flags: X - disabled, H - hotspot, D - dynamic
  #   ADDRESS         MAC-ADDRESS       EXPIRES-A... SERVER         STATUS
  0 H 10.5.50.2       00:40:96:13:B3:47 56s          hs-dhcp-server bound
[admin@HotSpot-GW] > ip hotspot active print
Flags: R - radius, H - DHCP
  #    USER        ADDRESS         UPTIME          SESSION-TIMEOUT IDLE-TIMEOUT
  0 R  Ex          10.5.50.2       2m25s
[admin@HotSpot-GW] > /ip hotspot active print stats
Flags: R - radius, H - DHCP
  #    USER        UPTIME          BYTES-IN   BYTES-OUT  PACKETS-IN PACKETS-OUT
  0 R  Ex          13m26s          145268     264282     475        494
[admin@HotSpot-GW] >
User statistics show accumulated values prior to current session.
[admin@HotSpot-GW] > ip hotspot user print stats
Flags: X - disabled
  #   NAME         UPTIME          BYTES-IN   BYTES-OUT  PACKETS-IN PACKETS-OUT
  0   Ex           6m29s           9896       31156      80         77
[admin@HotSpot-GW] >
User statistics values are updated after current session is closed. Values can be reset to '0' using the reset-counters command.
enabled-address Method
Planning the Configuration
Let us consider following example HotSpot setup:
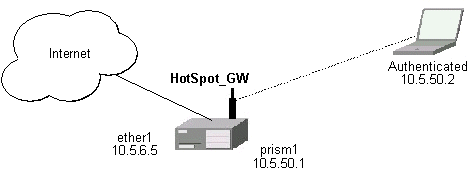
There are clients at prism1 interface, which are able to use Internet already. You want all clients at prism1 interface to authenticate before they are able to use Internet.
For hotspot client accounting, hotspot will add dynamic firewall rules in firewall hotspot chain. This chain has to be created manually. And all network packets (to/from hotspot clients) have to pass this chain.
Setup Example
Follow the steps below:
- Setup hotspot service to run on port 80 (www service has to be assigned
another port, e.g., 8081):
/ip service set www port=8081
/ip service set hotspot port=80
Note! Changing www service to other port than 80 requires thet you specify the new port when connecting to MikroTik router using WinBox, e.g., use 10.5.50.1:8081 in this case. - Setup hotspot profile to mark authenticated users with flow name "hs-auth":
/ip hotspot profile set default mark-flow="hs-auth" login-method=enabled-address
- Add local hotspot user:
/ip hotspot user add name=Ex password=Ex
- Redirect all TCP requests from unauthorized clients to hotspot service:
/ip firewall dst-nat add in-interface="prism1" flow="!hs-auth" protocol=tcp \
    dst-port=443 action=redirect to-dst-port=443 \
    comment="redirect unauthorized hotspot clients to hotspot service"
/ip firewall dst-nat add in-interface="prism1" flow="!hs-auth" protocol=tcp \
    action=redirect to-dst-port=80 \
    comment="redirect unauthorized clients to hotspot service"
Allow DNS requests and ICMP ping from temporary addresses and reject everything else:
/ip firewall add name=hotspot-temp comment="limit unauthorized hotspot clients" /ip firewall rule forward add in-interface=prism1 action=jump \ jump-target=hotspot-temp comment="limit access for unauthorized hotspot clients" /ip firewall rule input add in-interface=prism1 dst-port=80 protocol=tcp \ action=accept comment="accept requests for hotspot servlet" /ip firewall rule input add in-interface=prism1 dst-port=443 protocol=tcp \ action=accept comment="accept request for hotspot servlet" /ip firewall rule input add in-interface=prism1 dst-port=67 protocol=udp \ protocol=udp action=accept comment="accept requests for local DHCP server" /ip firewall rule input add in-interface=prism1 action=jump \ jump-target=hotspot-temp comment="limit access for unauthorized hotspot clients" /ip firewall rule hotspot-temp add flow="hs-auth" action=return \ comment="return if connection is authorized" /ip firewall rule hotspot-temp add protocol=icmp action=return \ comment="allow ping requests" /ip firewall rule hotspot-temp add protocol=udp dst-port=53 action=return \ comment="allow dns requests" /ip firewall rule hotspot-temp add action=reject \ comment="reject access for unauthorized clients"- Create hotspot chain for authorized hotspot clients:
/ip firewall add name=hotspot comment="account authorized hotspot clients"
- Pass all through going traffic to hotspot chain:
/ip firewall rule forward add action=jump jump-target=hotspot \
    comment="account traffic for authorized hotspot clients"
Note that in order to use SSL authentication, you should install an SSL certificate. This topic is not covered by this manual section. Please see the respective manual section on how to install certificates in MikroTik RouterOS
As we see from example, only hotspot interface is used - we don't care what IP addresses are there.
It is possible to add hotspot authentication for one more interface (prism2) by adding only 2 additional firewall rules:
- Setup dst-nat to redirect unauthorized clients to hotspot service:
/ip firewall dst-nat add in-interface="prism2" flow="!hs-auth" protocol=tcp \
action=redirect to-dst-port=80 \
comment="redirect unauthorized prism2 clients to hotspot service"
- Limit access for unauthorized prism2 interface clients:
/ip firewall rule forward add in-interface=prism2 action=jump \
jump-target=hotspot-temp comment="limit access for unauthorized prism2 clients"
/ip firewall rule input add in-interface=prism2 action=jump \
jump-target=hotspot-temp comment="limit access for unauthorized prism2 clients"
After successful authorization client is listed under active hotspot users:
[admin@HotSpot-GW] > ip hotspot active print
Flags: R - radius, H - DHCP
  #    USER        ADDRESS         UPTIME          SESSION-TIMEOUT IDLE-TIMEOUT
  0 R  Ex          10.5.50.2       2m25s
[admin@HotSpot-GW] > /ip hotspot active print stats
Flags: R - radius, H - DHCP
  #    USER        UPTIME          BYTES-IN   BYTES-OUT  PACKETS-IN PACKETS-OUT
  0 R  Ex          13m26s          145268     264282     475        494
[admin@HotSpot-GW] >
User statistics show accumulated values prior to current session.
[admin@HotSpot-GW] > ip hotspot user print stats
Flags: X - disabled
  #   NAME         UPTIME          BYTES-IN   BYTES-OUT  PACKETS-IN PACKETS-OUT
  0   Ex           6m29s           9896       31156      80         77
[admin@HotSpot-GW] >
User statistics values are updated after current session is closed. Values can be reset to '0' using the reset-counters command.
Optional Settings
- You may want to use same address space both for your LAN and HotSpot networks. Please consult the IP Address and ARP Manual for proxy-arp feature.
You may want to translate the destination address of all TCP port 25 connections (SMTP) from HotSpot users to your mail sever for mail relaying. Thus, users can retain their mail client setup and use your mail server for outgoing mail without reconfiguring their mail clients. If 10.5.6.100 is your mail server accepting connections from network 10.5.50.0/24, then the required destination NAT rule would be:
/ip firewall dst-nat add src-address=10.5.50.0/24 dst-port=25 protocol=tcp \ to-dst-address=10.5.6.100 action=nat \ comment="Translate SMTP TCP 25 port to our mail server"- Another option is to allow access certain pages without authentication.
This is useful, for example, to give access to some general information
about HotSpot service provider or billing options.
Include firewall rules into the hotspot-temp chain allowing access to certain
IP addresses prior the rule that rejects all other traffic from
temporary addresses. Also, add rules excluding destination NAT for these
addresses. For example:
1) in dst-nat: don't redirect requests going to your web server (x.x.x.x:80) (this rule has to be before "redirect to hotspot service" rule!)
/ip firewall dst-nat add dst-address=x.x.x.x/32 dst-port=80 protocol=tcp\
    action=accept
2) in hotspot-temp chain: accept requests going to your web server (this rule has to be before "reject access for unauthorized hotspot clients" rule!)
/ip firewal rule hotspot-temp add dst-address=x.x.x.x/32 dst-port=80 \ protocol=tcp action=return - For HotSpot clients to use transparent web-proxy on the same router,
following configuration can be used:
1) make sure, web-proxy package is installed;
2) it is assumed, that HotSpot is set up and successfully running. Hotspot clients are connected on interface named 'prism1'.
3) set up web-proxy to run on port 3128 using transparent mode:/ip web-proxy set enabled=yes address=0.0.0.0:3128 transparent-proxy=yes
4) set up HotSpot to use one of router's local IP addresses (10.5.50.1):
/ip hotspot set hotspot-address=10.5.50.1
5) redirect all requests from hotspot interface to port 80 (except to 10.5.50.1), to web-proxy:
/ip firewall dst-nat add in-interface=prism1 dst-address=!10.5.50.1/32 \
    dst-port=80 protocol=tcp action=redirect
    to-dst-port=3128 comment="transparent proxy"
Now, everything should be working. Only traffic of redirected requests to web-proxy will not be accounted. It's because this traffic will not pass through the forward chain.
6) to enable accounting for hotspot user traffic to/from transparent web-proxy, additional firewall rules should be added:
/ip firewall rule input add in-interface=prism1 dst-port=3128\ protocol=tcp action=jump jump-target=hotspot\ comment="account traffic from hotspot client to local web-proxy" /ip firewall rule output add src-port=3128 protocol=tcp\ out-interface=prism1 action=jump jump-target=hotspot\ comment="account traffic from local web-proxy to hotspot client" - You may want to allow multiple logins using the same username/password.
Set the argument value of only-one to no in hotspot profile, for example:
/ip hotspot profile set default only-one=no
- If you have dns-cache package installed, setup local DNS cache
and specify HotSpot gateway's address as primary DNS server
for DHCP clients, for example:
/ip dns-cache set primary-server=159.148.60.2 enabled=yes
/ip dhcp-server set hs-dhcp-server dns-server=10.5.50.1,159.148.108.1
Troubleshooting
- User cannot log in because of "NO CHAP" error
"NO CHAP" means, that hotspot server does not have a challenge for this IP address. It can be caused by:- logging in too slowly, i.e., client opens login page, but does login only after more than an hour;
- web browser gets login page from its own cache, without asking for it to hotspot server
Don't use Back button of web browser to enter login page! That "old" login page has already used challenge value, which is not valid on hotspot server anymore. - User cannot log in, although username and password are proven correct
Web browsers, that do not support JavaScript (for example, Internet Explorer 2.0), are not be able to authenticate users because of password encryption. In this case you may either update the browser or enable allow-unencrypted-passwords property in HotSpot Server's general settings, allowing plain-text passwords to travel in your network:/ip hotspot set allow-unencrypted-passwords=yes
- User cannot log in with Netscape 4.7x, bacause of "INVALID USER" error
It is caused by uninitialized domain value, which has value of "++" for those Netscape browsers. It will be fixed in RouterOS version 2.7.4. Now this can be fixed by changing hotspot login.html page. You will have to add line<input type="hidden" name="domain" value="">within form<form %form-input%> ... </form>
© Copyright 1999-2003, MikroTik