RIP Installation on the MikroTik RouterOS
The rip-2.6.y.npk package is required. The package can be downloaded from MikroTik’s web page www.mikrotik.com. To install the package, please upload one to the router with ftp and reboot.
RIP general settings are under the /routing rip menu:
[admin@MikroTik] routing rip>
RIP is interior gateway protocol based on distance vector algorithm. Route
which has the smallest number of hops (gateways) to destination is used. RIP
is described in RFC1058 and RIPv2 in RFC2453.

  interface  RIP interface settings
   neighbor
      route
    network
      print  Show RIP settings
        get  get value of property
        set  Change RIP settings
     export  Export RIP settings
[admin@MikroTik] routing rip> print
       redistribute-static: no
    redistribute-connected: no
         redistribute-ospf: no
          redistribute-bgp: no
             metric-static: 1
          metric-connected: 1
               metric-ospf: 1
                metric-bgp: 1
              update-timer: 30s
             timeout-timer: 3m
             garbage-timer: 2m
[admin@MikroTik] routing rip>
Argument description:
- redistribute-static - redistribution of static routes to neighbor routers
- redistribute-connected - redistribution of connected routes to neighbor routers
- redistribute-ospf - redistribution of routes learned by OSPF to neighbor routers
- redistribute-bgp - redistribution of routes learned by BGP to neighbor routers
- metric-static - metric, the distance to the destination for static routes
- metric-connected - metric, the distance to the destination for connected routes
- metric-ospf - metric, the distance to the destination for OSPF routes
- metric-bgp - metric, the distance to the destination for BGP routes
- update-timer - time period for RIP update to start
- timeout-timer - time period after route is not valid more
- garbage-timer - time period after dropped out route is dropped from neighbor router table
Set the desired argument values to yes for redistributing the routing information to other routers, for example:
[admin@MikroTik] routing rip> set redistribute-connected=yes
[admin@MikroTik] routing rip> print
       redistribute-static: no
    redistribute-connected: yes
         redistribute-ospf: no
          redistribute-bgp: no
             metric-static: 1
          metric-connected: 1
               metric-ospf: 1
                metric-bgp: 1
              update-timer: 30s
             timeout-timer: 3m
             garbage-timer: 2m
[admin@MikroTik] routing rip>
Note that maximum metric of RIP route can be 15. Metric higher than 15 is considered 'infinity' and routes with such metric are considered unreachable. Thus RIP cannot be used on networks with more than 15 hops between any two routers, and using redistribute metrics larger that 1 further reduces this maximum hop count.
RIP Interface Setup
To run RIP you don't have to configure interfaces. /routing rip interface command level is only for additional configuration of RIP specific interface parameters.
[admin@MikroTik] routing rip> interface add interface=ether1
[admin@MikroTik] routing rip> interface print
Flags: I - inactive
  0   interface=ether1 receive=v2 send=v2 authentication=none
      authentication-key="" prefix-list-in=none prefix-list-out=none


[admin@MikroTik] routing rip>
Argument description:
interface - physical network to access the first router. all sets the defaults, that will be used for all the interfaces not having specific settings
send - distributed RIP protocol versions. One of: v1, v1-2, v2
receive - RIP protocol versions the router can receive. One of: v1, v1-2, v2
authentication - authentication method for RIP messages:authentication-key - authentication key for RIP messages
- none - no authentication
- simple - clear text authentication
- md5 - Keyed Message Digest 5 (MD5) authentication
prefix-list-in - Name of the filtering prefix list for receiving routes
prefix-list-out - Name of the filtering prefix list for advertising routes
The prefix lists should be defined under the /routing prefix-list. See corresponding manual for the details on using prefix lists.
Security issue: it is recommended not to use RIP version 1 when it is possible.
RIP Networks
To start the RIP protocol, you have to define the networks on which RIP runs. Use the /routing rip network add command:
[admin@MikroTik] routing rip network> add address=10.10.1.0/24
[admin@MikroTik] routing rip network> print
  # ADDRESS
  0 10.10.1.0/24
[admin@MikroTik] routing rip>
Argument description:
address - the network address/mask that is associated with the area. It allows defining one or multiple interfaces RIP to be run on. Only directly connected networks of the router may be specified
network - specifies the network mask of the address (if it is not specified in the address argument)
Note that for P2P links here you should set exactly the same as the network address is (that is remote point IP address). In this case, the correct netmask bits should be 32
RIP Neighbors
To define a neighboring router with which to exchange routing information, use the /routing rip neighbour add command, for example:
[admin@MikroTik] routing rip> neighbor add address=10.0.0.1
[admin@MikroTik] routing rip> neighbor print
Flags: I - inactive
  #   ADDRESS
  0   10.0.0.1
[admin@MikroTik] routing rip>
Normally there is no need to add the neighbors, if the multicasting is working properly within the network. If there are problems with exchanging the routing information, the neighbors can be added to the list. It will force to exchange the routing information with the neighbor.
RIP Routes
The routes installed by RIP and other routing protocols can be viewed using the /routing rip route print command:
[admin@MikroTik] routing rip route> print
Flags: S - static, R - rip, O - ospf, C - connect, B - bgp
  0 O dst-address=0.0.0.0/32 gateway=10.7.1.254 metric=1 from=0.0.0.0

...

 33 R dst-address=159.148.10.104/29 gateway=10.6.1.1 metric=2 from=10.6.1.1

 34 R dst-address=159.148.10.112/28 gateway=10.6.1.1 metric=2 from=10.6.1.1

[admin@MikroTik] routing rip route>
Printout description:
dst-address - destination network address and netmask
gateway - last gateway to destination address
metric - distance vector length to the network
from - from which router this route was received
Additional Resources
Links for RIP documentation:
- http://www.ietf.org/rfc/rfc1058.txt - RIPv1 Protocol
- http://www.ietf.org/rfc/rfc2453.txt - RIPv2 Protocol
- Cisco Systems RIP protocol overview
Let us consider an example of routing information exchange between MikroTik router, a Cisco router, and the ISP (also mikrotik) routers:
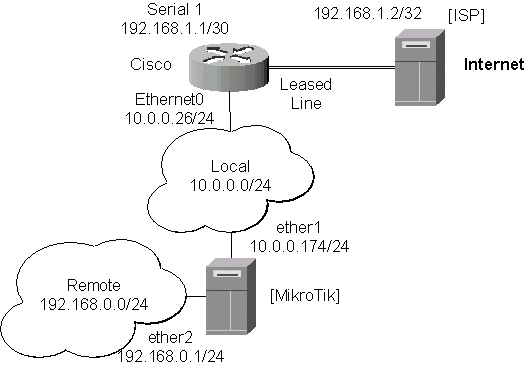
The Configuration of the MikroTik Router
The configuration of the MikroTik router is as follows:
[admin@MikroTik] > interface print
Flags: X - disabled, D - dynamic, R - running
  #    NAME                 TYPE             MTU
  0  R ether1               ether            1500
  1  R ether2               ether            1500
[admin@MikroTik] > ip address print
Flags: X - disabled, I - invalid, D - dynamic
  #   ADDRESS            NETWORK         BROADCAST       INTERFACE
  0   10.0.0.174/24      10.0.0.174      10.0.0.255      ether1
  1   192.168.0.1/24     192.168.0.0     192.168.0.255   ether2
[admin@MikroTik] > ip route print
Flags: X - disabled, I - invalid, D - dynamic, J - rejected,
C - connect, S - static, R - rip, O - ospf, B - bgp
    #    DST-ADDRESS        G GATEWAY         DISTANCE INTERFACE
    0 DC 192.168.0.0/24     r 0.0.0.0         0        ether2
    1 DC 10.0.0.0/24        r 0.0.0.0         0        ether1
[admin@MikroTik] >
Note, that no default route has been configured. The route will be obtained using the RIP. The necessary configuration of the RIP general settings is as follows:
[admin@MikroTik] routing rip> set redistribute-connected=yes
[admin@MikroTik] routing rip> print
       redistribute-static: no
    redistribute-connected: yes
         redistribute-ospf: no
          redistribute-bgp: no
             metric-static: 1
          metric-connected: 1
               metric-ospf: 1
                metric-bgp: 1
              update-timer: 30s
             timeout-timer: 3m
             garbage-timer: 2m

[admin@MikroTik] routing rip>
The minimum required configuration of RIP interface is just enabling the ether1:
[admin@MikroTik] routing rip interface> add interface=ether1
[admin@MikroTik] routing rip interface> print
Flags: I - inactive
  0   interface=ether1 receive=v2 send=v2 authentication=none
      authentication-key="" prefix-list-in=none prefix-list-out=none


[admin@MikroTik] routing rip interface>
Note, that the ether2 does not need to be enabled, if no propagation of RIP information is required into the Remote network. The routes obtained by RIP can be viewed in the /routing rip route menu:
[MikroTik] routing rip> route print
Flags: S - static, R - rip, O - ospf, C - connect, B - bgp
  0 R dst-address=0.0.0.0/0 gateway=10.0.0.26 metric=2 from=10.0.0.26

  1 C dst-address=10.0.0.0/24 gateway=0.0.0.0 metric=1 from=0.0.0.0

  2 C dst-address=192.168.0.0/24 gateway=0.0.0.0 metric=1 from=0.0.0.0

  3 R dst-address=192.168.1.0/24 gateway=10.0.0.26 metric=1 from=10.0.0.26

  4 R dst-address=192.168.3.0/24 gateway=10.0.0.26 metric=1 from=10.0.0.26

[admin@MikroTik] routing rip>
The regular routing table is:
[MikroTik] routing rip> /ip route print
Flags: X - disabled, I - invalid, D - dynamic, J - rejected,
C - connect, S - static, R - rip, O - ospf, B - bgp
    #    DST-ADDRESS        G GATEWAY         DISTANCE INTERFACE
    0  R 0.0.0.0/0          r 10.0.0.26       120      ether1
    1  R 192.168.3.0/24     r 10.0.0.26       120      ether1
    2  R 192.168.1.0/24     r 10.0.0.26       120      ether1
    3 DC 192.168.0.0/24     r 0.0.0.0         0        ether2
    4 DC 10.0.0.0/24        r 0.0.0.0         0        ether1
[admin@MikroTik] routing rip>
As we can see, the MikroTik router has learned RIP routes from the Cisco router.
The Configuration of the Cisco Router
Cisco#show running-config
...
interface Ethernet0
 ip address 10.0.0.26 255.255.255.0
 no ip directed-broadcast
!
interface Serial1
 ip address 192.168.1.1 255.255.255.252
 ip directed-broadcast
!
router rip
 version 2
 redistribute connected
 redistribute static
 network 10.0.0.0
 network 192.168.1.0
!
ip classless
!
...
The routing table of the Cisco router is:
Cisco#show ip route
Codes: C - connected, S - static, I - IGRP, R - RIP, M - mobile, B - BGP
       D - EIGRP, EX - EIGRP external, O - OSPF, IA - OSPF inter area
       N1 - OSPF NSSA external type 1, N2 - OSPF NSSA external type 2
       E1 - OSPF external type 1, E2 - OSPF external type 2, E - EGP
       i - IS-IS, L1 - IS-IS level-1, L2 - IS-IS level-2, * - candidate default
       U - per-user static route, o - ODR

Gateway of last resort is 192.168.1.2 to network 0.0.0.0

     10.0.0.0/24 is subnetted, 1 subnets
C       10.0.0.0 is directly connected, Ethernet0
R    192.168.0.0/24 [120/1] via 10.0.0.174, 00:00:19, Ethernet0
     192.168.1.0/30 is subnetted, 1 subnets
C       192.168.1.0 is directly connected, Serial1
R    192.168.3.0/24 [120/1] via 192.168.1.2, 00:00:05, Serial1
R*   0.0.0.0/0 [120/1] via 192.168.1.2, 00:00:05, Serial1
Cisco#
As we can see, the Cisco router has learned RIP routes both from the MikroTik router (192.168.0.0/24), and from the ISP router (0.0.0.0/0 and 192.168.3.0/24).
© Copyright 1999-2002, MikroTik